Alive5 Quick Start Guide
Creating an Account
To create an account, go to https://alive5.com/ and click the Login button.
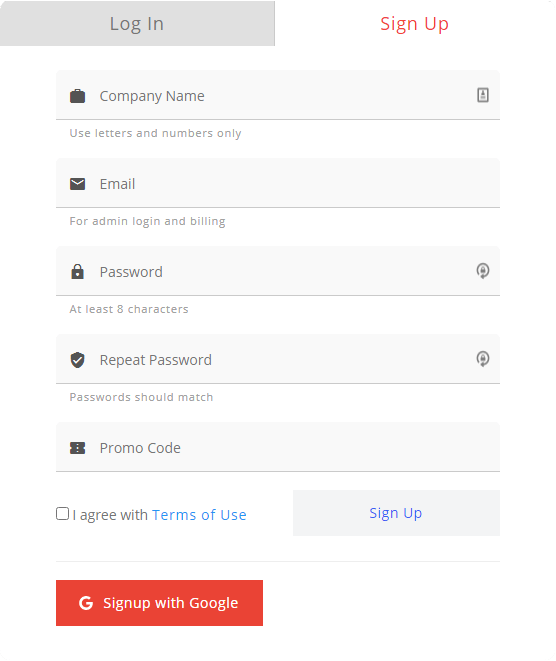
Click on the Sign Up tab.
Enter the required information.
Submit your Invitation Code (optional).
You will be sent a verification link to your email.
Follow the link in your email to the login page and fill out the details. Company organization and username will be auto-filled. Put your password in and hit the Login button below to access your Alive5 Dashboard.
Choose Your Plan by selecting the number of users on the account and then select a text package in the Choose an Add On drop down. Once you have these fields selected, press the blue Proceed With Checkout button.
Log In To Alive5
Save this link for future logins: https://app.alive5.com/login
Channels
Channels can also be called a Category or a Department. Channels can be created for multiple reasons but the most common is routing incoming communications to specific Channels and Users assigned to those channels.
For instance if Bob is an agent and Bob only handles Billing, then you can assign Bob to the Billing Channel and all incoming communications will be routed to Bob.
Setting Up A Channel
To set up a channel, from the Dashboard go to Channels.
In the top right corner select + New Channel.
Create a Channel Title and fill in an Email Address.
Select all the Users you’d like to include in this channel.
Click Create Channel.
Users
Users are the people who will be communicating with your customers. To add users to your account:
From your Dashboard go to Users and select + New User from the top right corner.
Fill out the form including Email, Phone, Screen Name, Role, etc.
Assign the channels that you’d like this User to access
Click Create User when finished.
This User will receive an email activation and will need to follow the email’s link and sign in.
Editing Users
To edit a user to reassign roles or channels, from the Dashboard go to Users.
Find the User you’d like to edit and select the Edit Button from the table’s row.
Make the changes you’d like to the User’s account and select Update User.
Note: You will not be able to change a User’s email address once used.
Tags
Create Tags to use for your SMS conversations. These labels allow you to tag a customer’s SMS with a custom description or even send the conversation to an attached email address.
Example: If you make a “leads” tag, you can put the prospect’s number in the leads tag, and group all the people that are leads.
To create a Tag
From the Dashboard select Tags.
Select + New Tag from the top right corner.
Give your Tag a Name (example: Leads).
Assign an email address.
Click Create Tag.
Widgets
A widget is the image or icon you will place on your website for visitors to click and initiate the Live Chat or SMS conversation. It is also the first step for creating your Chatbots.
Create a Widget
To create a Widget, from the Dashboard select Widgets.
Click + New in the top right corner.
Select a pre-designed widget or upload your own image to use as the widget.
Select what this Widget will be used for, Live Chat or SMS Text Message.
Select the Channel(s) you'd like to use.
From here you will be able to customize your window.
Customization Guide coming soon.
From the tabs you will be able to edit your Window, Widget, get The Code you need to launch on your website and alter any Settings.
To install the code on your website, visit The Code tab and copy the code and paste it into your website where you'd like it to show up.
Chatbots
Before we start creating your first Chatbot, let’s define some terms and descriptions about what Chatbots are and what they do. Bots allow you to respond to Visitors via SMS or Live Chat automatically without the need for human interaction.
A Bot Flow is a collection of Bots in which you can configure or "chain" together to create an automated conversational flow with a visitor. Alive5 includes some built-in Bots that you can set up instantly to start communicating with your Visitors.
To get started, let's create your first Bot Flow.
From the Dashboard select Bots.
To create a new Bot Flow, select + New Bot Flow in the top right corner.
Fill in the form with a Bot Name and Type of Message.
- If Live Chat message type, you’ll be routing a bot to a specific Widget which is then routed to specific Channel(s).
- If an SMS Text Message, you’ll be routing to a specific Channel, since there is no widget.
Once your settings are how you like them, click Create Bot Flow.
Now you’ve entered into a Bot Flow matrix called
To build a bot click + Add Trigger bot.
Select Greeting/Home to begin.
From here you can add a message, GIF, image, video, url or social message.
Once filled in select Save.
Now, grab the green dot with your mouse and drag it away from the Greeting/Home box and drop it.
From this list you will be able to add 4 pre-made templates or start your own.
Select the bot you’d like and start editing.
Select from Free-Text or Multiple Choice.
Multiple Choice will allow visitors to choose their own path to get them to the answers they need. Once you are satisfied with your 1st question, click Next.
Now that you have a question, you can create answers, which further route your visitors to the information they seek.
Once you have finished your Bot Flow, click the alive5 logo to return to the Dashboard.
Be sure the Widget that your Bot Flow is attached to is added to your website. To add a Widget to a website, see the Widgets section.
Hints:
- Create as many questions and answers as you want.
- If you click your widget on the bottom right, you will be able to see and test the botflow in real time.
FAQS
FAQs are questions asked often by your website visitor - think of them like Hotkeys. A good example of this would be
“How much does this cost?” You can easily answer these questions with a push of a button by setting up FAQs.
Create a New FAQ
To create a new FAQ, from the Dashboard click FAQs.
Click + New Category from the top right corner.
Give the Category a Title and select any Channels you’d like these FAQs to appear.
Once satisfied, select Create Category.
Now when you are in a live chat conversation within the designated channels, you’ll be able to utilize these FAQs to speed up conversations and give your visitors the answers they need.
Settings
Settings is where you can:
- Review all the phone numbers hosted in your Alive5 account
- Review and change your AlivePay settings
- Connect your WebsiteAlive AliveChat account
- Change your notification settings.
Reporting
Reporting allows you to review everything about your Alive5 account and agent performance. Review your SMS, AlivePay, Chatbots, Conversations, Agent Performance and Contacts. Review by date range and download reports in .CSV format.
SMS
Alive5 allows you to communicate with your customers via Text/SMS Message either by using an existing line or we’ll provide a number for you.
To enable an existing line:
Go to Settings.
In the top right corner click + New.
Select the New Connection you want to make - in this case Text/SMS Messaging.
Click Transfer Existing Phone Number.
Select the Channel you’d like all messages to appear.
Type in the Phone Number in the field provided and Confirm.
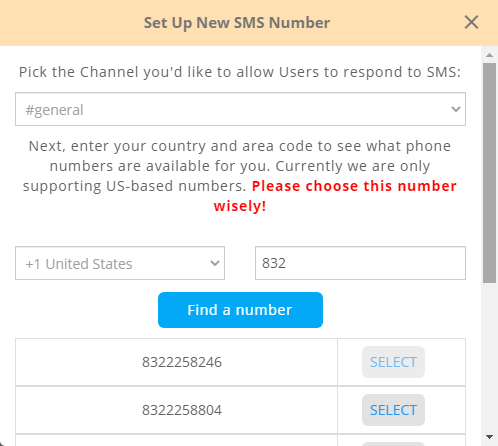
To enable a new phone line:
Go to Settings.
In the top right corner click + New.
Select the New Connection you want to make - in this case Text/SMS Messaging.
Click Reserve New Phone Number.
Select the Channel you’d like all messages to appear.
Select your country.
Input your area code.
Click Find a Number.
Find the number you’d like and click Select next to it to select it.
Your Text/SMS Message line is now available for you to use. All messages sent on this number will be routed to the Channel you selected.
Change Channel:
To change the Channel that your number is routed to, or select from multiple channels:
Go to Settings.
Find the number in the list and click the Edit icon to the right of the table’s row.
From here you can select the Channel(s) you’d like to reroute this number.
Live Chat
To access your Live Chat Operator Panel, click the Live Chat icon on the left side of your screen, or alternatively from the Dashboard select Live Chat.
The user interface is quite easy to understand:
On the left side of your screen is your Live and Closed Live Chats. In the Live Tab you will see a list of Incoming chats, other agent’s chats and a list of people browsing your website. When a chat comes in you will get a pop up to accept, transfer to deny the chat.
In the middle of your screen is the dialog area. From here you can conduct your chat with your site visitor. Above the conversation area, you will see some information about your visitor, their name, location, OS, IP address and which page they are visiting.
On the right side of your screen you will see an Contact Information for your site visitor. This is where you will keep all of your visitor’s information to save for current and future use. You can also connect each visitor to your CRM with the click of a button - such as Salesforce, MS Dynamics or Hubspot.
WebsiteAlive Integration
If you have a WebsiteAlive AliveChat account, you can still use it even within Alive5. To add your AliveChat account:
From the Dashboard click WebsiteAlive.
Fill in the login information from your WebsiteAlive account and click Login.
Once logged in you’ll be able to access your AliveChat interface.
Note: To change Administrator settings in your WebsiteAlive account will still require you to visit https://www.websitealive.com/ and login as Administrator.
Campaigns
Campaigns allow your team to send text messages to many Contacts at once. In order to create a Campaign you will need a campaign and a list of contacts.
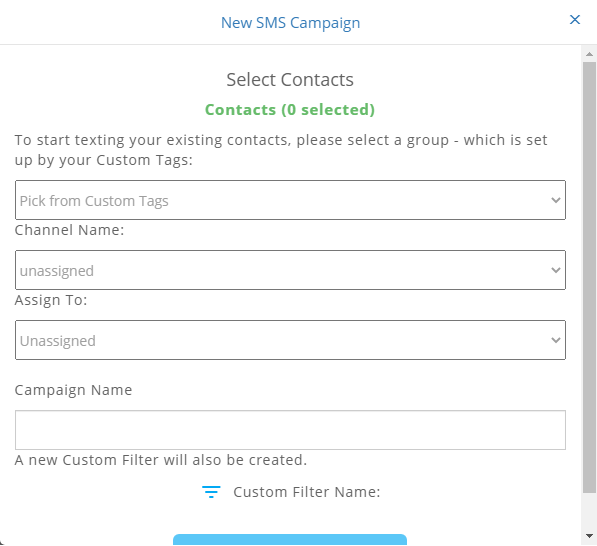
From the Dashboard select Campaigns:
Click Create A Campaign in the top right corner.
From here you will need to select a Tag, Channel Name to assign it to, an agent this is assigned to.
Finally give the Campaign a name and Select Create Campaign.
Next, craft your message.
Once satisfied, click Create SMS Campaign.