

HubSpot CRM
Introduction
Welcome to the Alive5 HubSpot CRM integration guide.
This guide explains how to connect your Alive5 account to HubSpot CRM and configure the integration to search, create, view, and associate HubSpot records from Alive5.
With the HubSpot CRM integration, agents can:
- Search HubSpot CRM records from Alive5.
- Create new HubSpot CRM records.
- View record details.
- Associate SMS conversations and live chats with HubSpot records.
- Automatically push SMS conversations and chats to HubSpot records.
- Configure custom entities and fields.
- Customize the fields displayed when searching for or creating records.
- Configure custom search and detail fields.
- Configure backend fields for SMS and chat workflows.
Welcome to Alive5 Integration Guides. Here you will find how to connect your Alive5 account with HubSpot CRM.
HubSpot CRM Connection
To use the HubSpot CRM integration, you need an active HubSpot CRM account connected to Alive5. HubSpot API access is also required for the integration.
Connect HubSpot CRM to Alive5
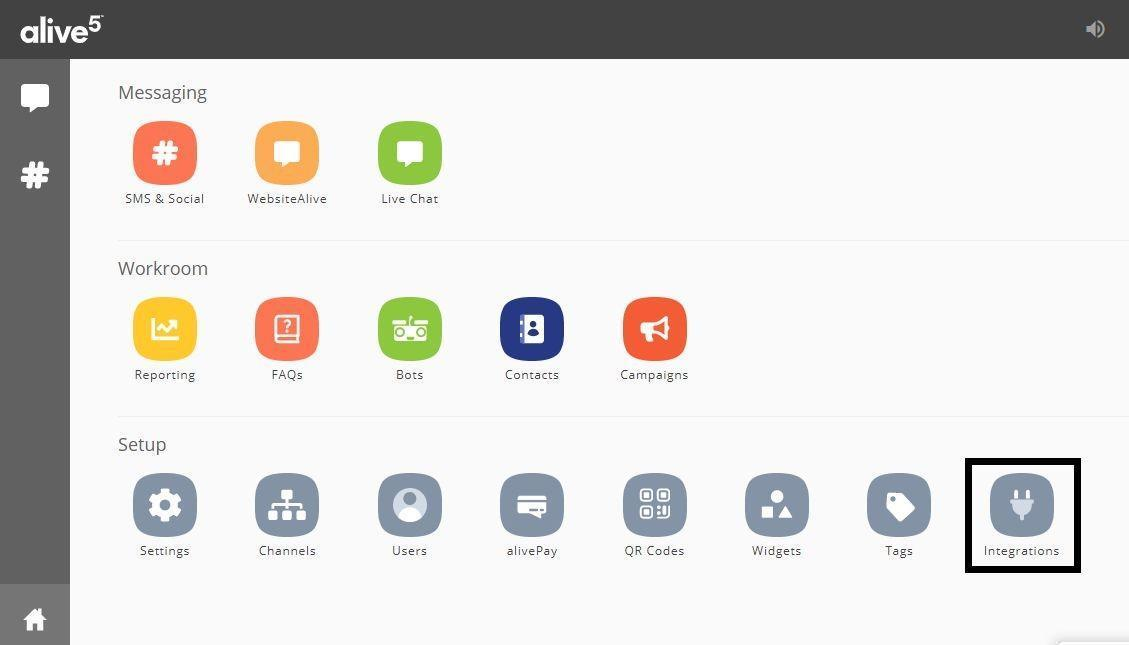
From the Alive5 dashboard, select Integrations in the lower-right corner of the screen.
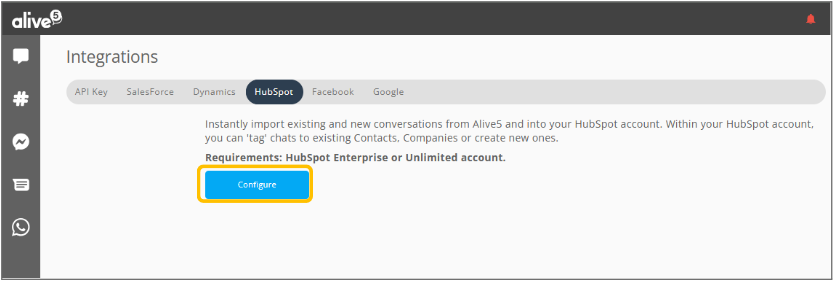
Click on the HubSpot tab and click the Configure button.
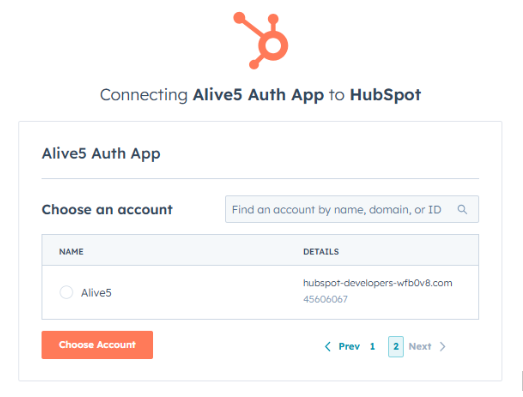
The system will redirect you to the HubSpot connect app page. Select the HubSpot account you want to connect and click “Choose Account”.
After authentication is completed, you will be redirected to the Alive5 HubSpot Integration page.
The integration status should display Connected.
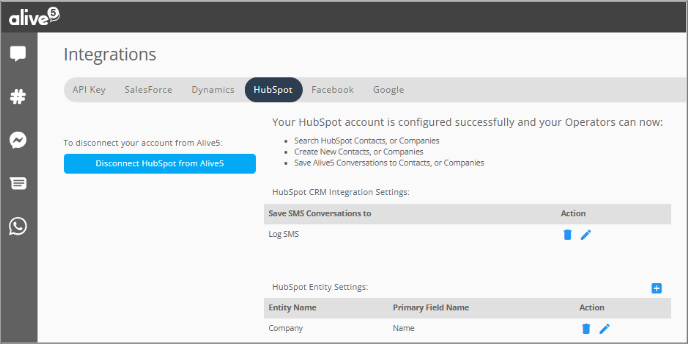
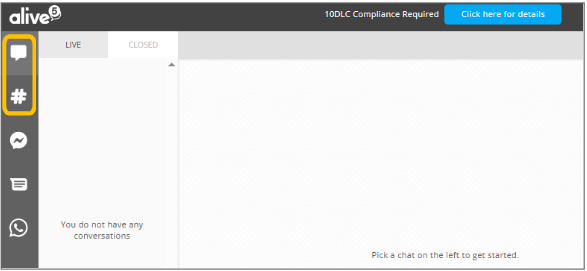
Once the account is connected, go to the SMS or Live Chat applications to begin using the CRM integration.
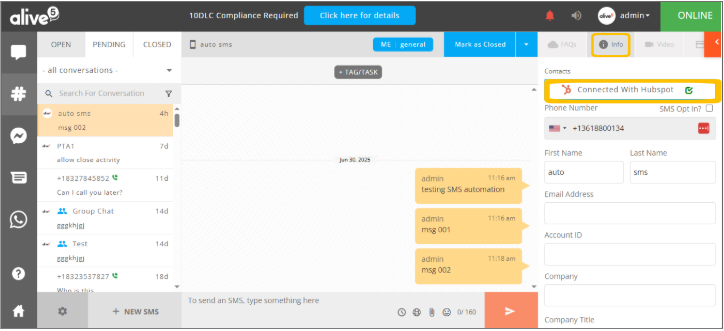
In the right-side panel, select the Info tab. Click Connected with HubSpot.
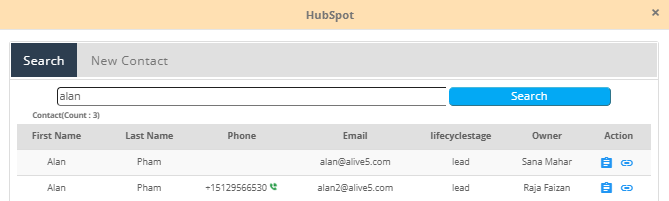
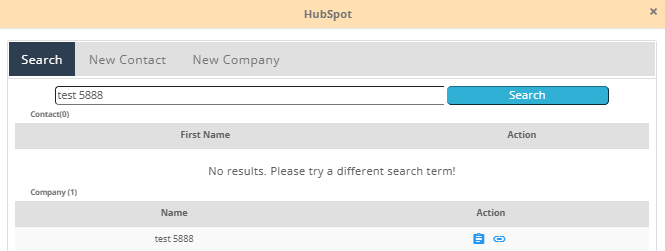
A popup window opens where you can search for existing HubSpot records or create new records.
By default, Alive5 can use the following visitor information when searching for or creating records:
- Phone number
- Email address
- Full name
Integration Settings
The Integration Settings section allows you to configure how Alive5 interacts with HubSpot CRM.
You can control how contacts are searched and created, how conversations are saved, and how SMS and live chat conversations are automatically associated with HubSpot records.
Steps to configure these settings
Click the configuration button

as shown below.

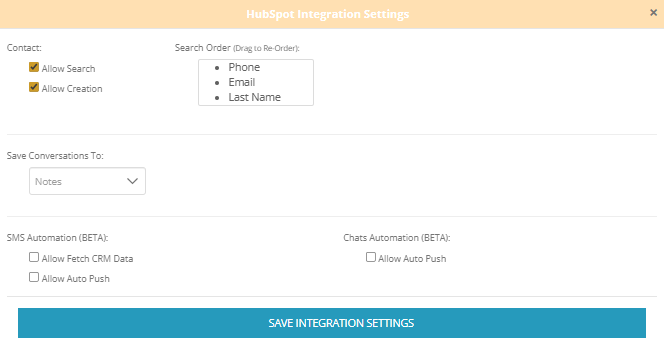
The Integration form opens
Contact Settings
Allow Contact Search
When enabled, agents can search for HubSpot Contact records.
When disabled, Contact search is unavailable.
Default: Enabled.
Allow Contact Creation
When enabled, agents can create new HubSpot Contact records.
When disabled, agents cannot create new Contact records.
Default: Enabled.
Search Order
The Search Order setting determines the order in which Alive5 searches for HubSpot records.
You can prioritize the following visitor fields:
- Phone
- Last name
Drag and drop the fields to define the search priority.
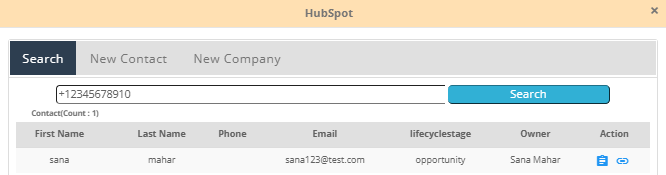
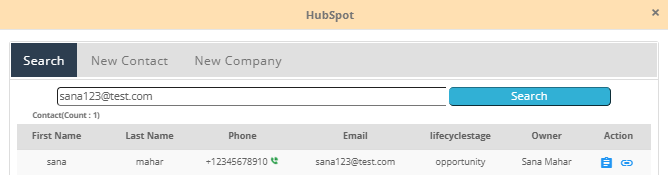
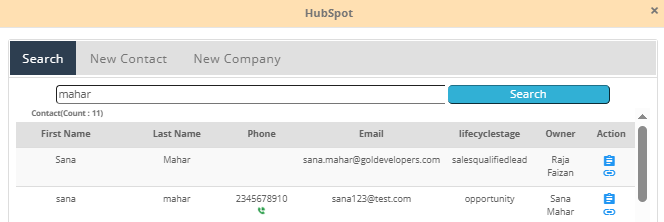
For example, if the order is Phone → Email → Last Name, Alive5 searches for a matching phone number first. If no matching record is found, it searches by email address. If no email match is found, it searches by last name.
Scenario #1: When All Three Fields Are Available
If the visitor provides a phone number, email address, and last name:
- Alive5 searches HubSpot using the visitor's phone number.
- If no matching record is found, Alive5 searches using the visitor's email address.
- If no matching record is found, Alive5 searches using the visitor's last name.
Scenario #2: When Not All Three Fields Are Available
If the visitor does not provide a phone number:
- Alive5 searches using the visitor's email address.
- If no email address is available, Alive5 searches using the visitor's last name.
The same principle applies when other visitor fields are unavailable.
Activity Settings
The Activity Settings section controls how SMS and chat conversations are stored in HubSpot CRM.
Save Conversations To
The Save Conversations To setting determines where Alive5 saves SMS and chat activity in HubSpot.
The available options are:
- Notes — Default option.
- Tasks
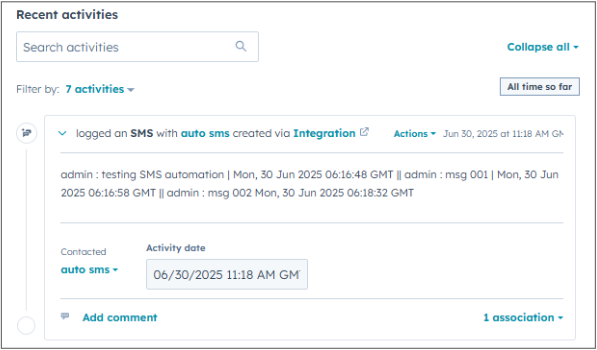
- Log SMS
When Tasks or Log SMS is selected, an Activity Name field appears. This field is populated with the applicable API name by default.
The SMS or chat conversation is saved to the selected activity associated with the HubSpot record.

Allow Fetch CRM Data
The Allow Fetch CRM Data setting enables Alive5 to retrieve information from HubSpot based on the phone number used when creating a new SMS.
When a matching HubSpot record is found, the available contact information can be used to populate the appropriate fields automatically.
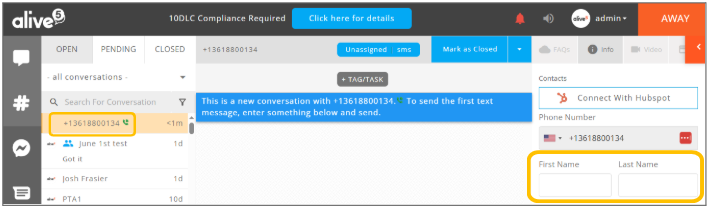
When the feature is disabled, the applicable fields remain empty.
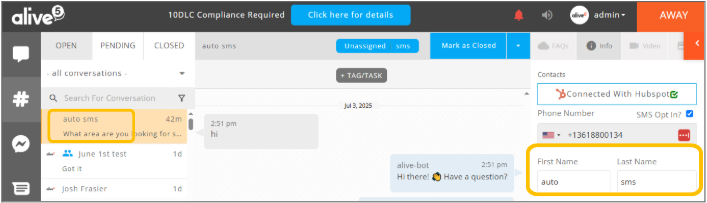
When the feature is enabled, Alive5 retrieves the matching information from HubSpot and automatically populates the applicable fields.
SMS Automation
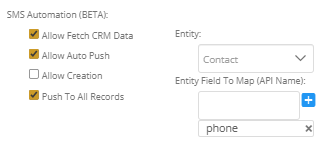
The SMS automation settings allow Alive5 to automatically find HubSpot records and associate SMS conversations with them.
Allow Auto SMS Push
When enabled, Alive5 automatically associates an SMS conversation with the first HubSpot record found using the configured entity and field mapping.
For example, you can select:
- Entity: Contact
- Entity Field: Phone
Alive5 uses the visitor's phone number to search HubSpot Contacts. If a matching record is found, the SMS conversation is associated with that record.
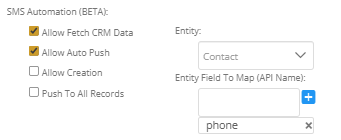
Allow Creation
When Allow Creation is enabled together with Allow Auto SMS Push, Alive5 creates a new HubSpot record when no matching record is found.
The SMS conversation is then pushed to the newly created record.
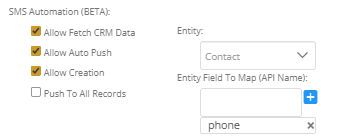
Push To All Records
When Push To All Records is enabled, the SMS conversation is associated with all HubSpot records that match the configured search criteria.
If both Push To All Records and Allow Creation are enabled and no matching record exists, Alive5 creates a new record. If matching records exist, the conversation is pushed to all matching records.
Chat Automation
Chat Automation setting allows Alive5 to automatically associate a live chat with one or more HubSpot records based on the configured entity and field mapping.
It also allows Alive5 to create a new record when no matching record is found.
To configure Auto Chat Push, select:
- One or more channels.
- An entity.
- The entity fields used for matching.
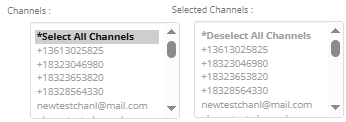
Channels
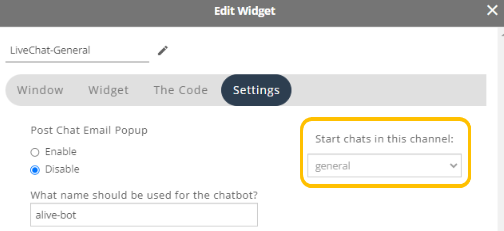
Selecting one or more channels limits automatic chat pushing to chats associated with the selected automation channels.
Field Identifier
The Field Identifier setting determines the order in which Alive5 searches for HubSpot records based on entity field to map.
For example, you can configure:
- Phone
with phone as mapping field
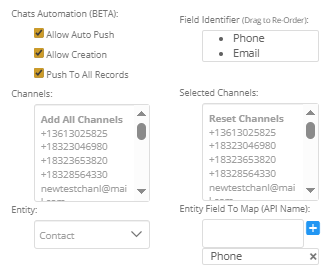
Alive5 first searches HubSpot using the visitor's phone number. If no matching record is found, it searches using the visitor's email address.
If a matching record is found, the chat thread is pushed to the matching HubSpot record when the chat ends.
If the visitor does not provide a phone number, Alive5 uses the email address instead.
If no matching record is found and Allow Creation is enabled, Alive5 creates a new HubSpot record.
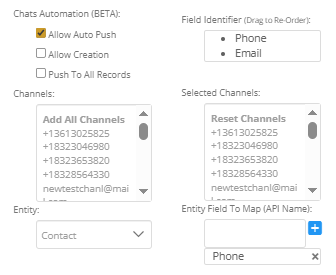
Allow Auto Chat Push
When enabled, Alive5 pushes conversation to the very first matching record found in HubSpot against the configured entity, entity field to map and the field identifier.
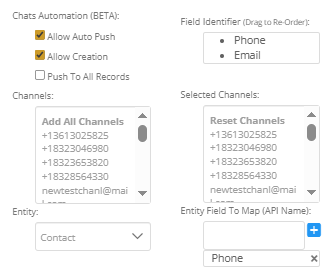
Allow Creation
When enabled, Alive5 creates a new HubSpot record if no matching record is found.
The new record is created under the selected HubSpot entity using the visitor's available information, such as their phone or full name.
Push to All Records
When enabled, Alive5 pushes the chat to all matching HubSpot records rather than only the first matching record.
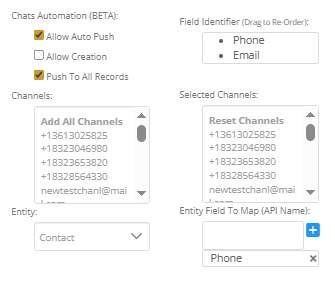
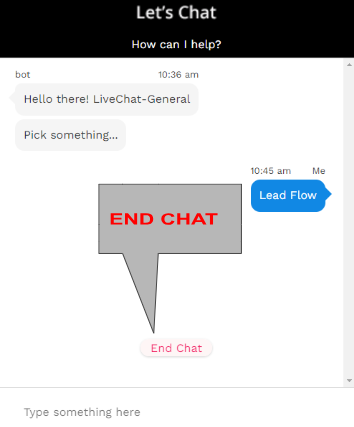
Important: When “Push To All” and “Allow Creation” are both enabled and there are no records in the CRM with the same Phone(Entity Field To Map) then a new record is created else chat is pushed to all records found.
Entity Settings
The Entity Settings section allows you to add additional HubSpot entities in addition to the default Contact entity.
Once an entity is added, agents can:
- Search for records.
- Create new records.
- Tag chats or SMS conversations.
- View record details.
Add a Custom Entity
Click the configuration button

The Entity Settings form opens
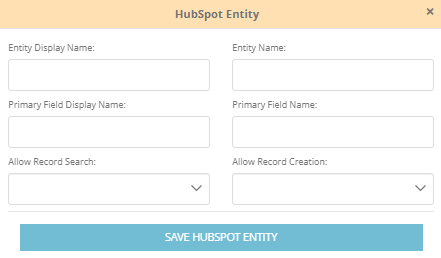
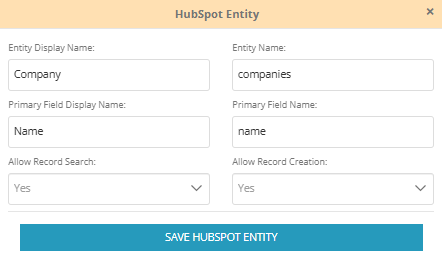
Entity Display Name
Enter the display name that agents will see when using the entity.
Entity Name
Enter the API entity name exactly as it appears in HubSpot CRM.
Primary Field Display Name
Enter the field name that agents will see when creating a new record.
Primary Field Name
Enter the API field name exactly as it appears in HubSpot CRM.
Allow Record Creation
When set to Yes, agents can create records for the custom entity.
When set to No, agents cannot create records for the entity.
Allow Record Search
When set to Yes, agents can search records for the custom entity.
When set to No, agents cannot search records for the entity.
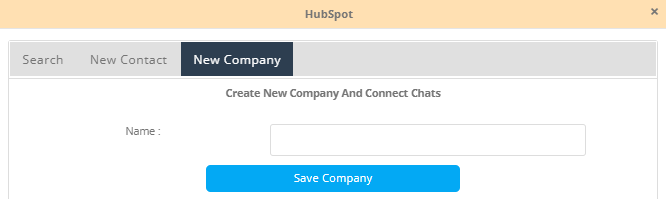
Custom Export Fields
The Custom Export Fields section allows you to add additional fields from default or custom HubSpot entities to the record creation form.
Fields can be configured as either:
- Constant
- Input Field
A constant field uses a predefined value whenever a record is created. The field is not displayed to the agent.
An input field is displayed on the record creation form, allowing the agent to enter a value when creating the record.
Input fields can also be marked as required.
Add a Custom Export Field
Click the configuration button

A new form opens
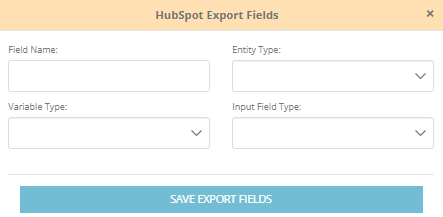
Field Name
Enter the API field name exactly as it appears in HubSpot CRM.
Entity Type
Select the entity to which the field belongs.
The list includes default entities and custom entities configured in the Entity Settings section.
Variable Type
Select the variable type:
- Constant
A constant value is configured when the field is created. The same value is pushed to HubSpot each time a record is created.
- Input Field
An input field allows the agent to provide a value when creating the record.
Input Field Type
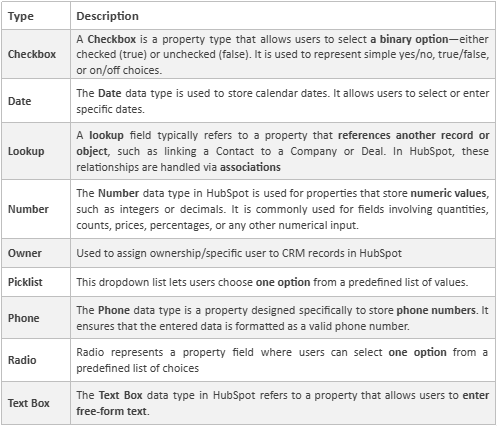
Select the data type for the field.
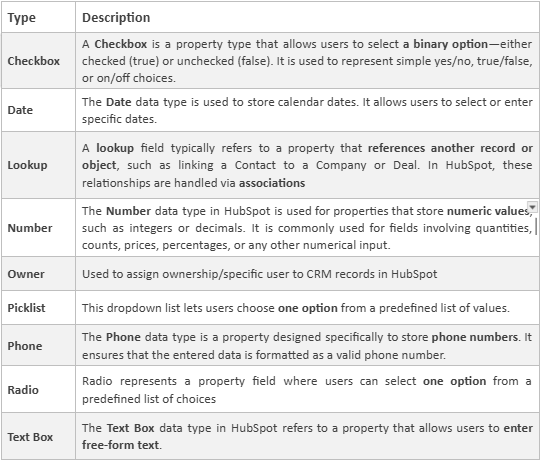
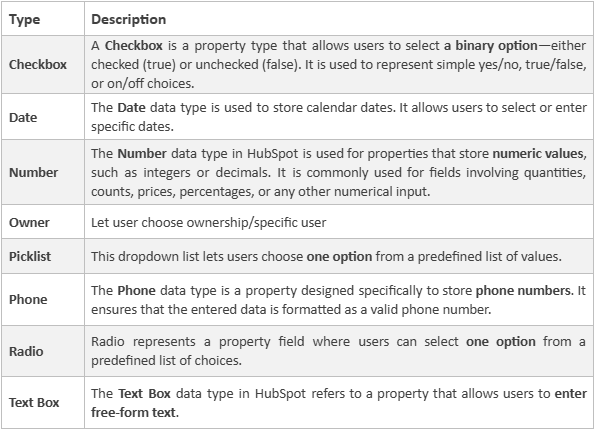
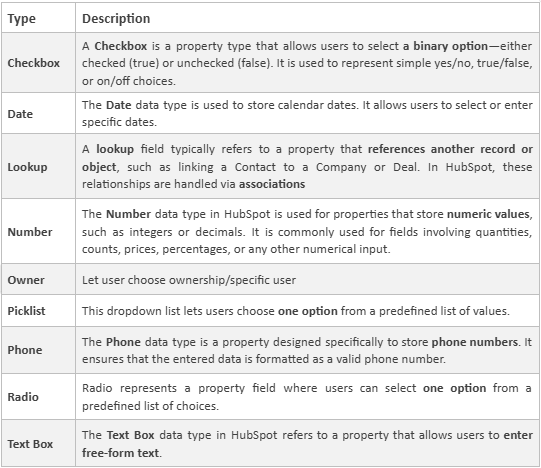
The available field types include:
Custom Export Fields – Constant Variable Type
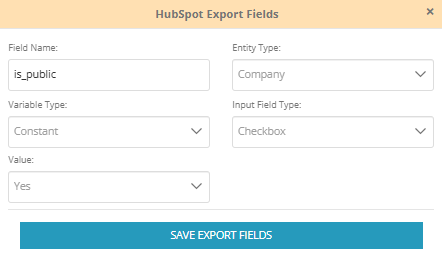
When Constant is selected as the variable type, additional configuration fields are displayed based on the selected input field type.
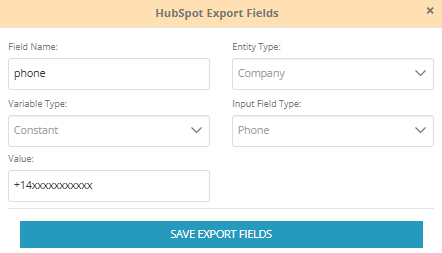
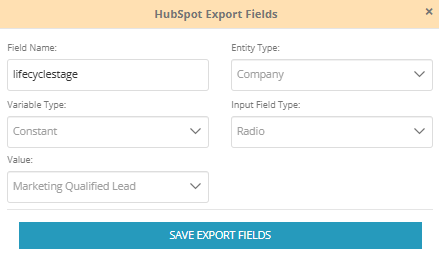
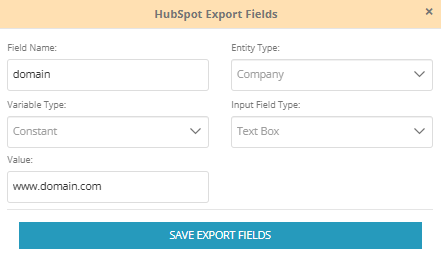
For most field types, a Value field is provided.
For lookup fields, the form includes fields for the related entity and lookup record.
- Checkbox input field type:

- Date input field type:

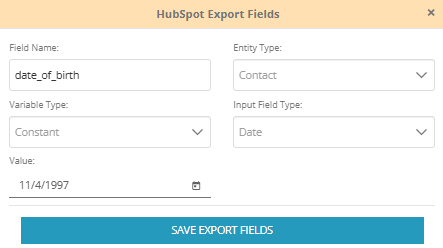
- Lookup input field type:
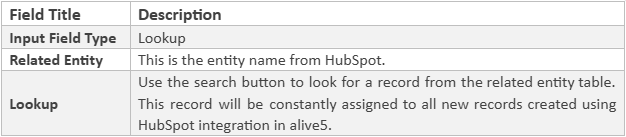
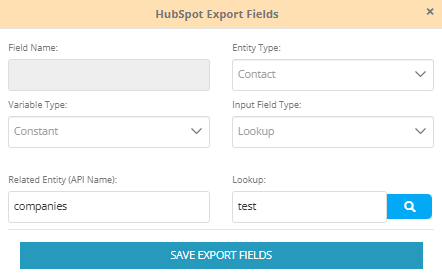
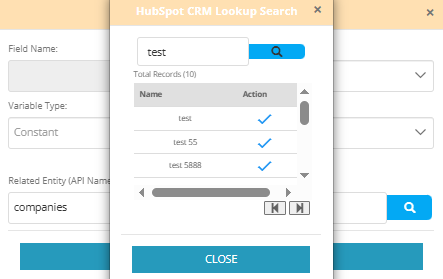
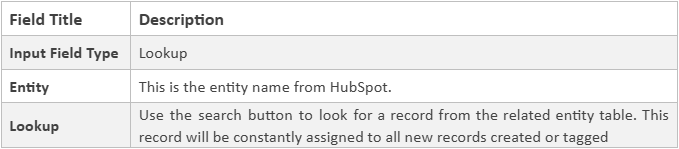
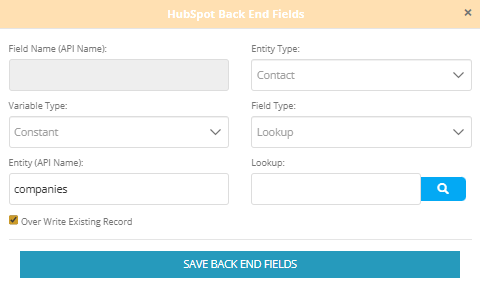
* Note: Field name for lookup type is disabled as it is not required in HubSpot. We just need to provide a related entity API name and select a record to associate it to the parent entity.
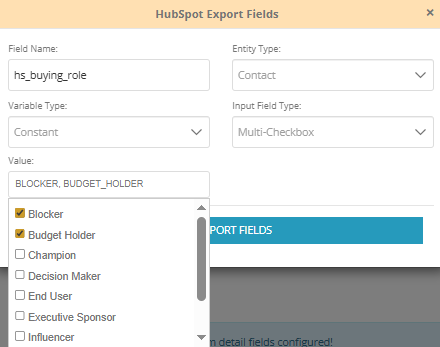
- Multi-checkbox input field type:
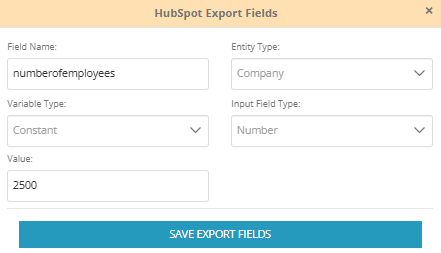
- Number input field type:

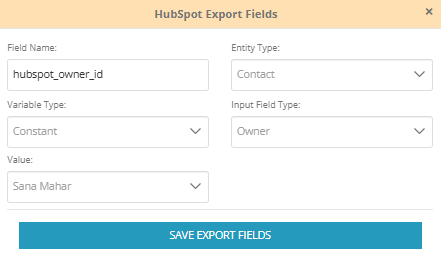
- Owner input field type:

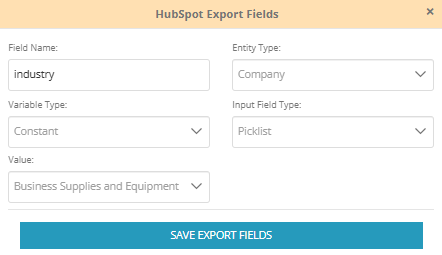
- Picklist input field type:

- Phone input field type:

- Radio input field type:

- Textbox input field type:

Custom Export Fields – Input Variable Type
When Input Field is selected as the variable type, additional configuration fields are displayed.
The available configuration includes:
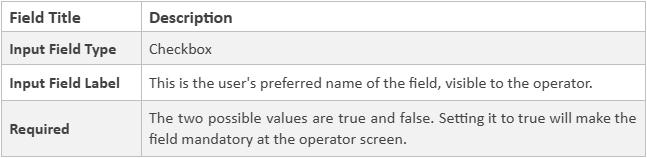
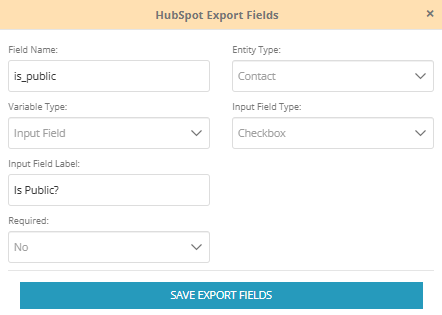
- Input field label
- Required
- Max length, where applicable
- Use current date/time, for date fields
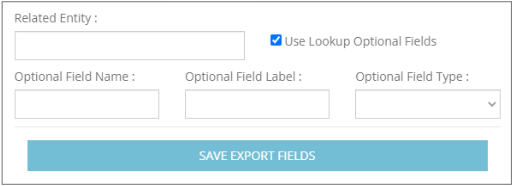
- Related entity, for lookup fields
- Lookup optional fields, where applicable
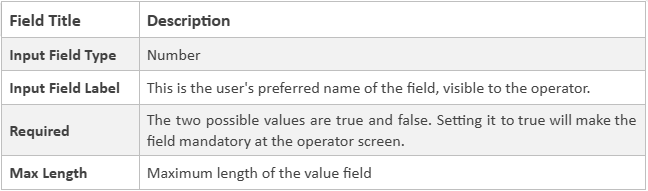
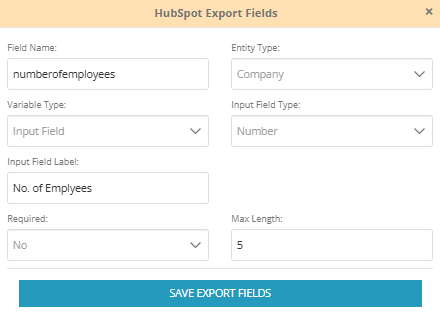
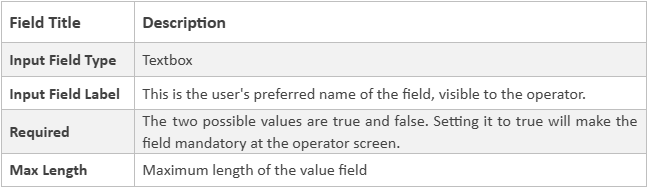
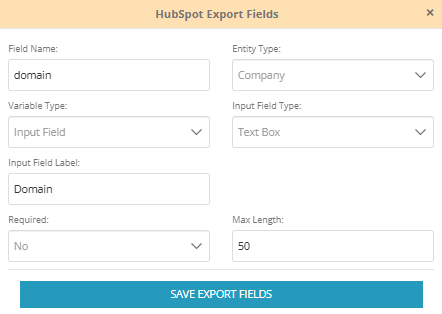
- For number, phone and textbox, Max Length can be configured to limit the number of characters entered by the agent.

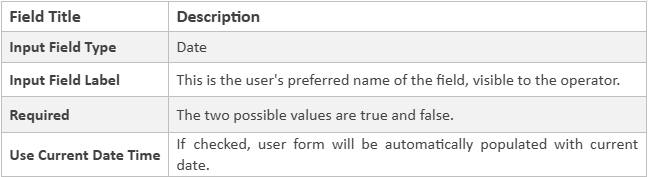
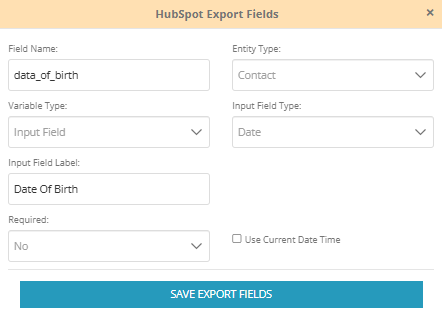
- For date fields, Use Current Date Time can be enabled to automatically populate the current date and time.

- For lookup fields, the related entity can be selected and optional lookup fields can be enabled.

If use lookup optional fields is enabled, form looks like this:
- Checkbox input field type:
- Number input field type:
- Textbox input field type:
- Date input field type:
- Lookup input field type:
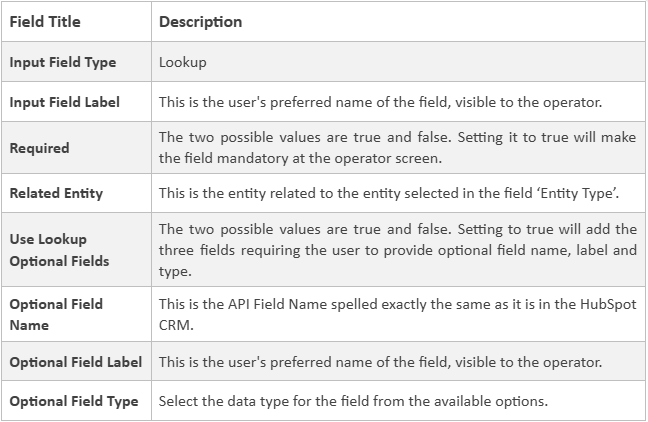
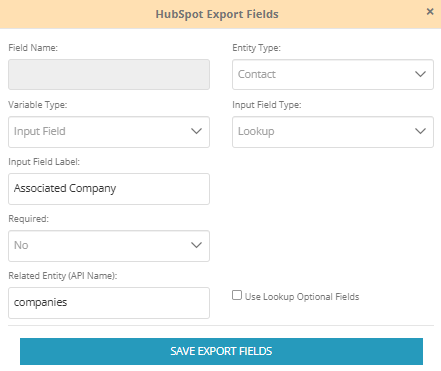
* Note: Field name for lookup type is disabled as it is not required in HubSpot. We just need to provide a related entity API name and select a record to associate it to the parent entity.
- Owner input field type:
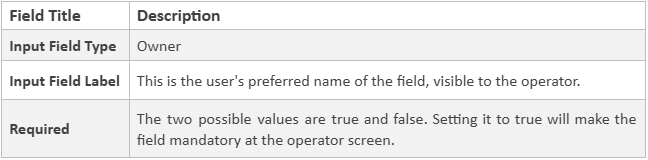
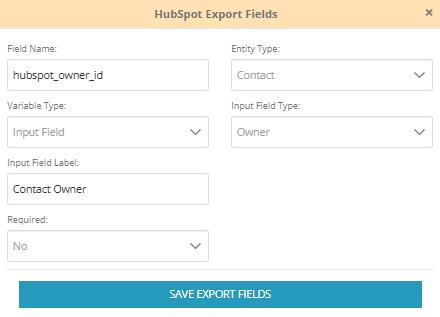
- Picklist input field type:
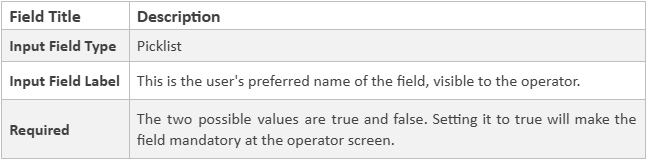
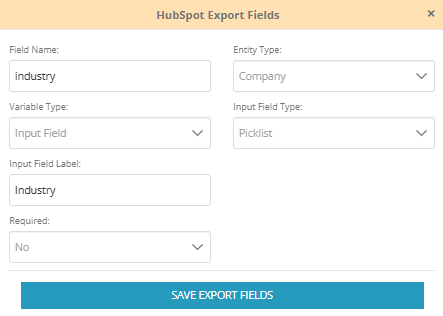
- Phone input field type:
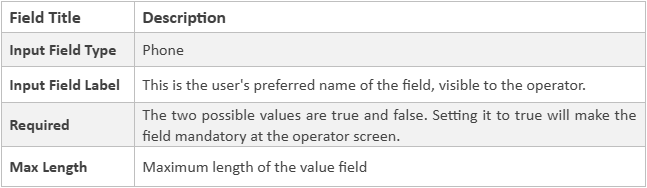
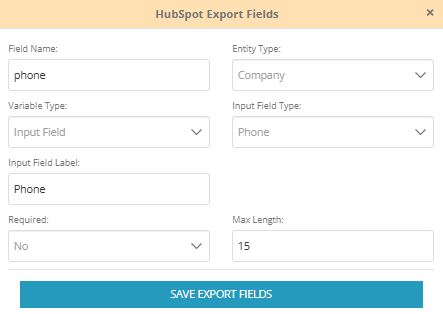
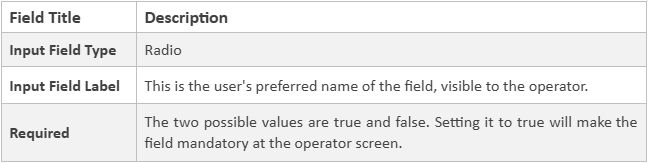
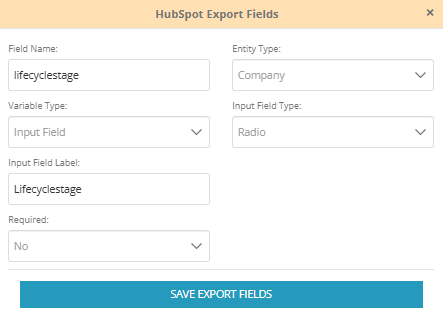
- Radio input field type:
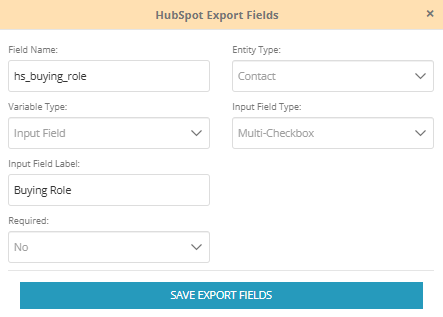
- Multi-checkbox input field type:
Custom Search Fields
By default, agents can search HubSpot records using standard fields such as:
- Name
- Phone number
The Custom Search Fields section lets you add additional fields that agents can use when searching for records.
Adding a custom search field also displays that field as an additional column in the search results.
For the best user experience, use Custom Detail Fields when additional information needs to be displayed after a record has been found.
Add a Custom Search Field
Click the configuration button

A new form opens
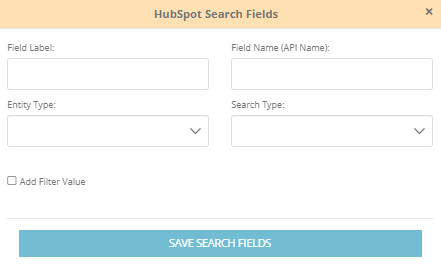
Field Label
Enter the label that should appear in the search results.
Field Name
Enter the field name exactly as it appears in HubSpot CRM.
Entity Type
Select the entity on which the search should be performed.
Search Type
Select the data type that corresponds to the selected field.
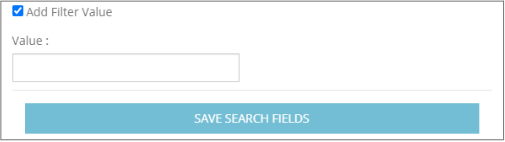
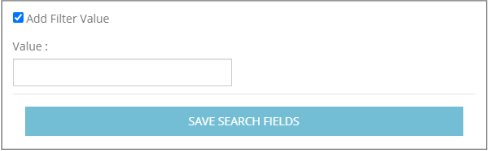
Add Filter Value
Enable this option when you want to limit search results to records that meet a specific filter condition.
When enabled, a Value field appears and allows you to specify the value used for filtering.
Custom Search Fields – Add Filter Value Disabled
When Add Filter Value is disabled, agents can search records using the value entered for the custom search field.
For example, a custom Number field such as Number of Employees can be added to the Company entity. Agents can then search using an employee count.
For picklist, radio, and multi-checkbox fields, the full value must be entered because partial value searches are not supported for these field types.
Custom Search Fields – Add Filter Value Enabled
When Add Filter Value is enabled, Alive5 returns only records that meet the configured filter criteria.
For example, a Number field such as Number of Employees can be configured for the Company entity with a filter value of 2000. The search will then return companies that meet the configured condition.
Custom Detail Fields
Custom Detail Fields allow additional HubSpot record information to be displayed in the record detail view.
For the default Contact entity, standard fields include:
- First Name
- Last Name
- Phone
Add a Custom Detail Field
Click the configuration button

A new form opens
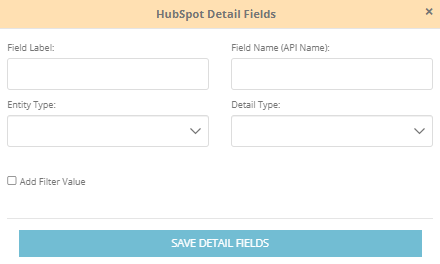
Field Label
Enter the label that should appear in the record detail view.
Field Name
Enter the field name exactly as it appears in HubSpot CRM.
Entity Type
Select the entity for which the detail field should be displayed.
Field Type
Select the data type of the field.
Add Filter Value
Enable this option when the field should be used to limit the records returned by a search.
After searching for a record, agents can click the Details icon in the Action column to view the additional information.
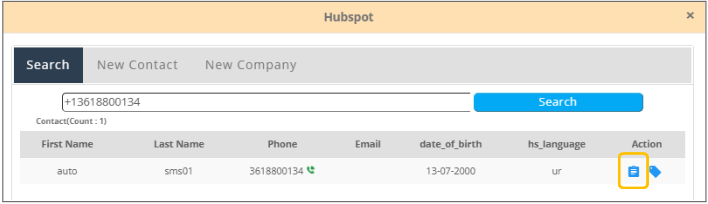
You can add multiple detail fields for an entity.
Clicking the Details icon opens the detail view and displays the standard and custom fields configured for the selected entity.
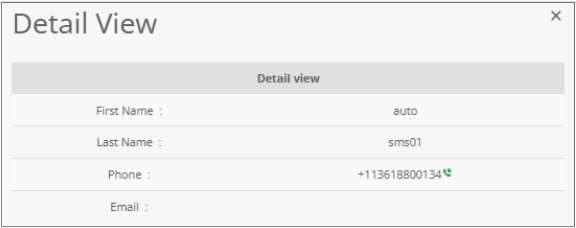
Custom Detail Fields – Add Filter Value Disabled
When Add Filter Value is disabled, agents can view the configured field value in the record detail view.
The field can also be used as a search criterion based on the value entered by the agent.
Custom Detail Fields – Add Filter Value Enabled
When Add Filter Value is enabled, Alive5 uses the configured filter criteria to limit the records returned.
Custom Backend Fields
The Backend Fields section allows you to add fields from default or custom HubSpot entities that Alive5 can populate automatically.
Backend Fields can be configured as:
- Constant
- Input Field
Backend fields can be used when:
- A chat transcript ends.
- An SMS conversation is pushed.
- A new HubSpot entity record is created.
- A chat or SMS conversation is tagged to a record.
Add a Backend Field
Click the configuration button

A new form opens
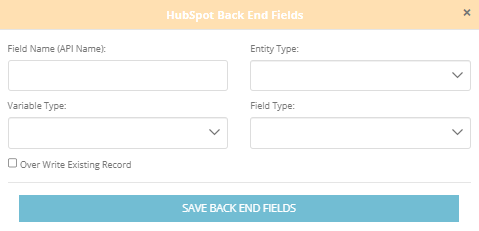
Field Name
Enter the API field name exactly as it appears in HubSpot CRM.
Entity Type
Select the entity to which the field belongs.
Variable Type
Select either Constant or Input Field.
- Constant
The same configured value is automatically pushed each time the backend field is used.
- Input Field
The field is displayed to the agent, allowing a value to be entered when creating or tagging a record.
Field Type
Select the appropriate field data type.
Overwrite Existing Record
When enabled, the backend field can overwrite an existing value in the corresponding HubSpot field.
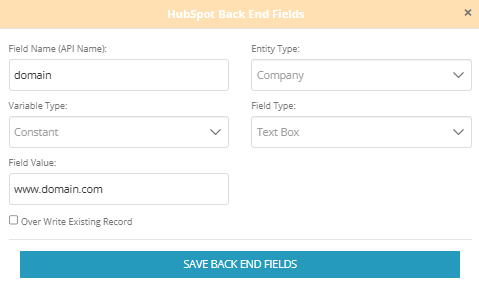
Backend Fields – Constant Variable Type
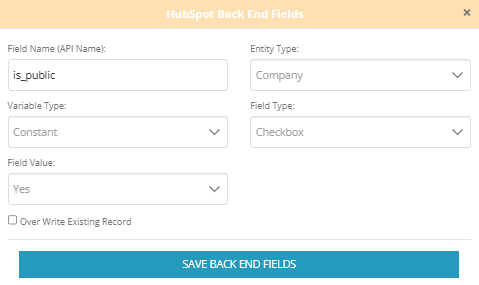
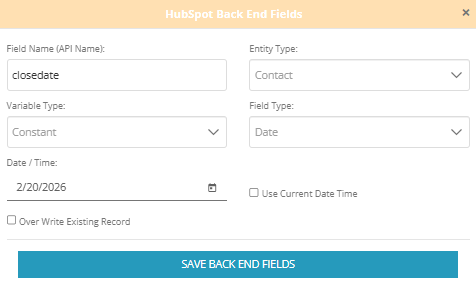
When Constant is selected, additional configuration fields are displayed based on the selected field type.
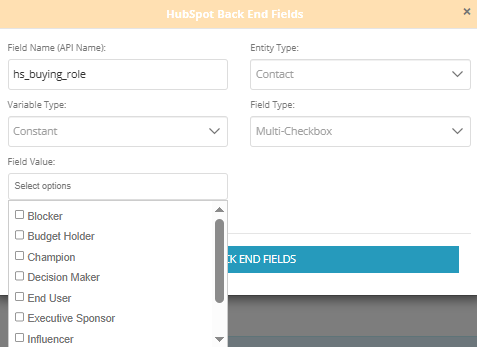
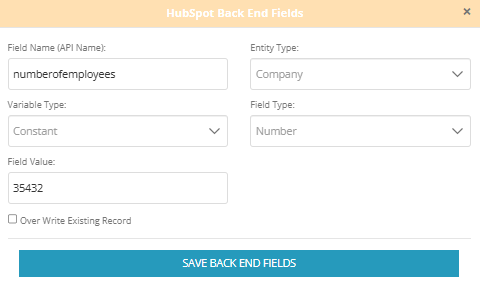
For most field types, a Field Value field is provided.
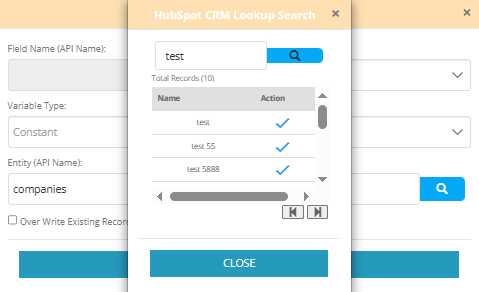
For lookup fields, the form includes the related entity and lookup record.
- Checkbox input field type:

- Date input field type:

- Lookup input field type:
- Multi-checkbox input field type:
- Number input field type:

- Owner input field type:

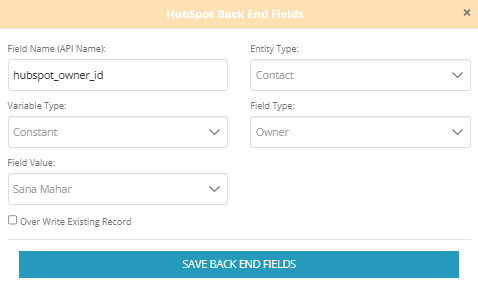
- Picklist input field type:

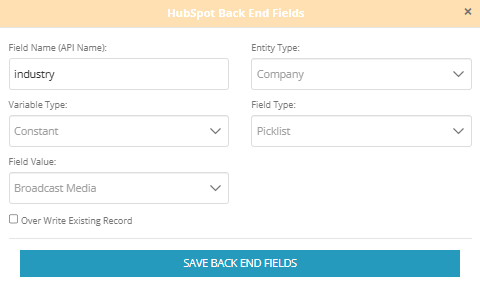
- Phone input field type:

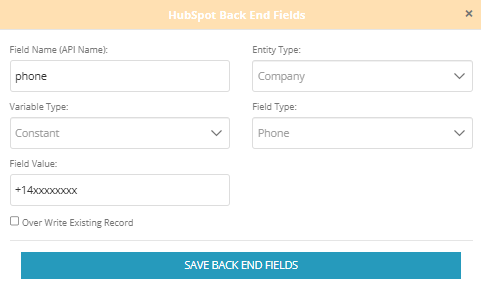
- Radio input field type:

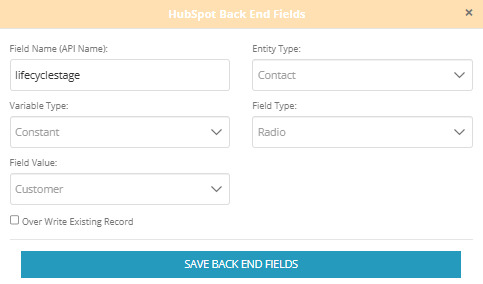
- Textbox input field type:

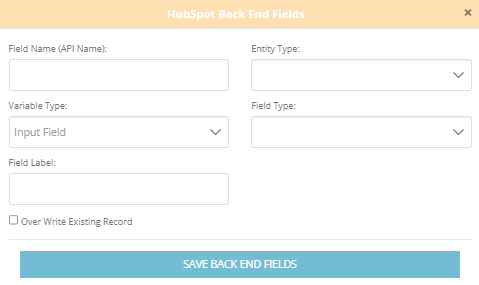
Backend Fields – Input Variable Type
When Input Field is selected, an additional Field Label is displayed.
The field appears in the applicable Alive5 form, allowing the agent to enter the value when creating or tagging a HubSpot record.
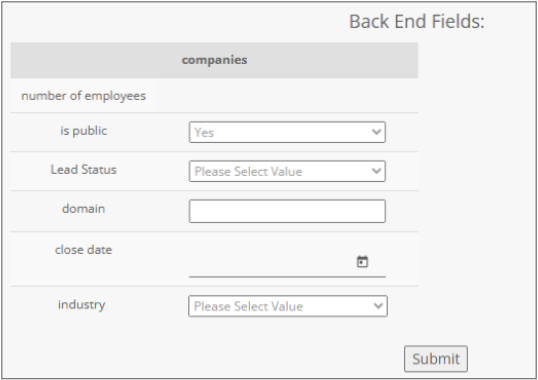
After backend fields are configured, they are displayed in the applicable record creation or tagging workflow.
Pushing SMS / Chat
An SMS or chat can be automatically pushed to HubSpot when the applicable automation settings are enabled.
To manually push an SMS or chat, open the SMS or Live Chat application.
Select the Info tab and click Connected with HubSpot. A popup window opens. Search for the HubSpot record you want to associate with the conversation.
After a record is found, a Tag icon appears in the Action column.
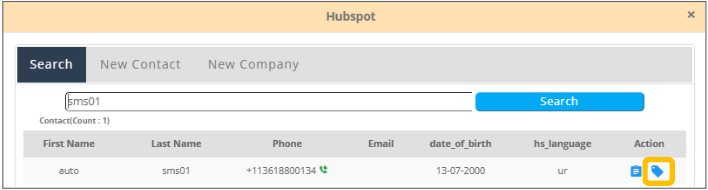
Click the Tag icon to associate the conversation with the selected HubSpot record.
For SMS, once the conversation is tagged, subsequent messages can be appended to the associated HubSpot activity.
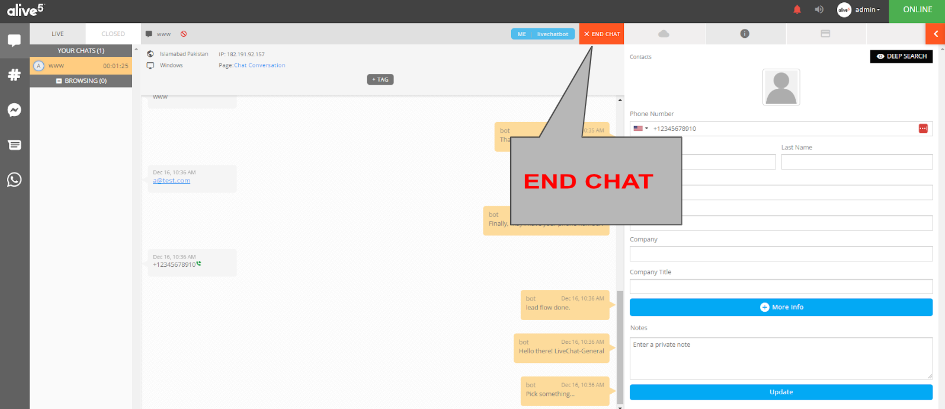
For Live Chat, the conversation must be ended before the chat can be pushed manually to HubSpot CRM.
Disconnecting CRM
To disconnect HubSpot CRM from Alive5:
- Go to Integrations.
- Select HubSpot.
- Click Disconnect HubSpot from Alive5.
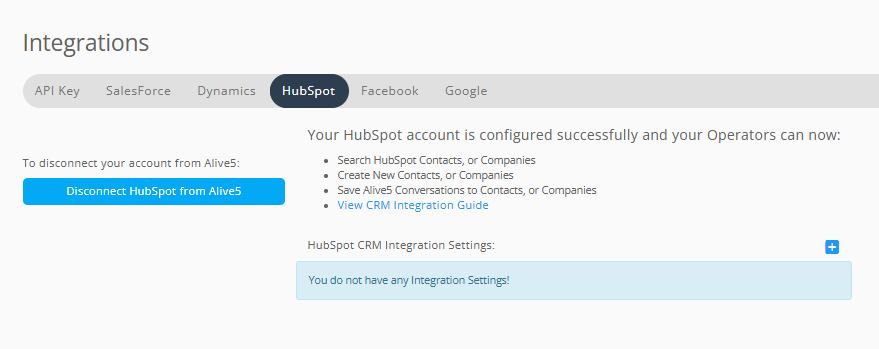
The HubSpot CRM integration will be disconnected from the Alive5 account.
Summary
The Alive5 HubSpot CRM integration provides a flexible way to connect SMS and live chat conversations with HubSpot CRM records.
Administrators can configure:
- HubSpot CRM authentication
- Contact search
- Contact creation
- Search priority
- Conversation storage
- CRM data retrieval
- Automatic SMS pushing
- Automatic chat pushing
- Custom entities
- Custom export fields
- Custom search fields
- Custom detail fields
- Backend fields
- Field ordering
Once configured, agents can use Connected with HubSpot from an SMS or live chat conversation to search for, create, view, and associate HubSpot CRM records directly from Alive5.