

Microsoft Dynamics 365
Introduction
Welcome to the Alive5 Microsoft Dynamics 365 integration guide.
This guide explains how to connect your Alive5 account to Microsoft Dynamics 365 and configure the integration to search, create, view, and associate Dynamics 365 records from Alive5.
With the Microsoft Dynamics 365 integration, agents can:
- Search Dynamics 365 records from Alive5.
- Create new Dynamics 365 records.
- View record details.
- Associate SMS conversations and live chats with Dynamics 365 records.
- Automatically push SMS conversations and chats to Dynamics 365 records.
- Configure custom entities and fields.
- Customize the fields displayed when searching for or creating records.
- Automatically populate Dynamics 365 fields using Alive5 variables.
- Configure backend fields for SMS and chat workflows.
CRM Connection
To use the Dynamics 365 integration, you need an active Microsoft Dynamics 365 CRM account.
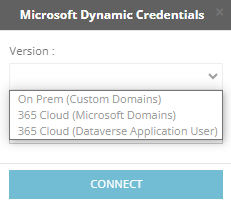
Alive5 supports the following connection types:
- On Prem (Custom Domains)
- 365 Cloud (Microsoft Domains)
- 365 Cloud (Dataverse Application User)
Connect Microsoft Dynamics 365 to Alive5
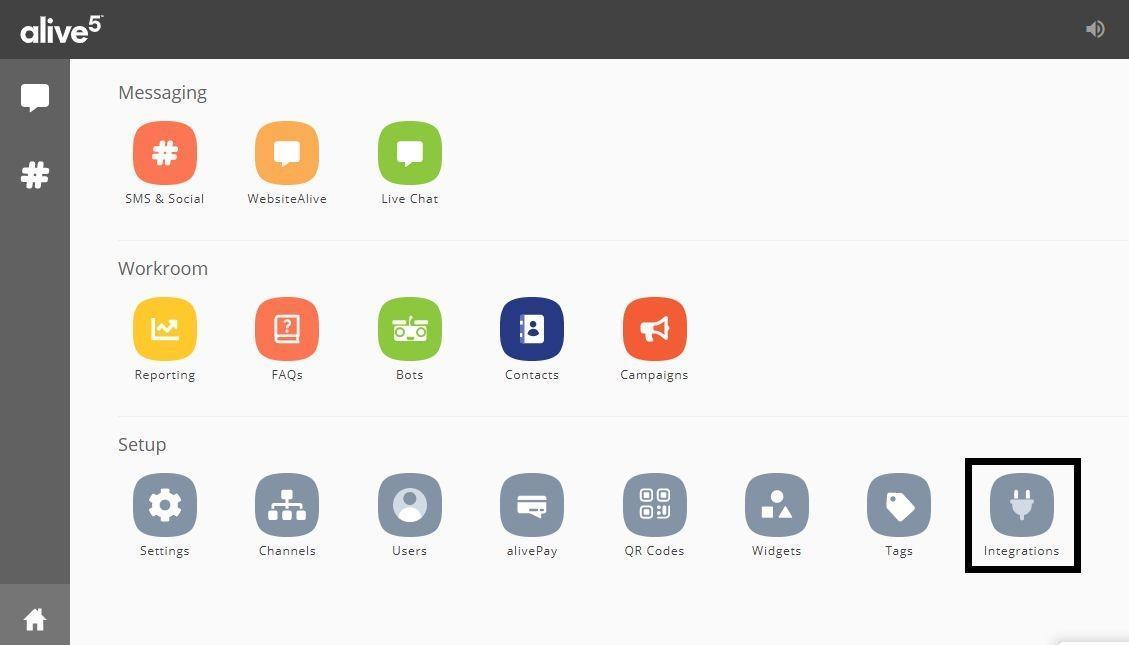
From the Alive5 dashboard, select Integrations in the lower-right corner of the screen.
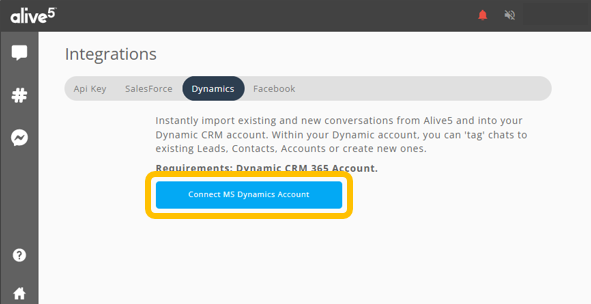
Select the Dynamics. And click Connect MS Dynamics Account.
Select the connection type that corresponds to your Dynamics 365 instance.
On Prem (Custom Domains)
If you are using the On Prem (Custom Domains) version, provide the following information:
- Username
- Application URL
- Password
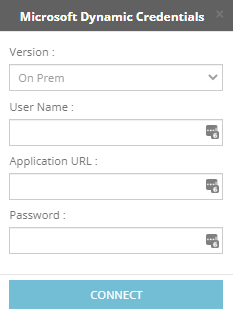
Click Connect.
For Dynamics 365 cloud instances, the username is usually an email address.
For Internet-Facing Deployment (IFD), the username is typically entered in the following format:
Domain\username
365 Cloud (Microsoft Domains)
If you are using the 365 Cloud (Microsoft Domains) version, a Microsoft login window will appear.
- Select the Microsoft account used to access Dynamics 365.
- Enter your password.
- Sign in.
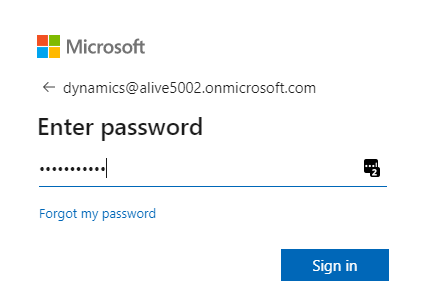
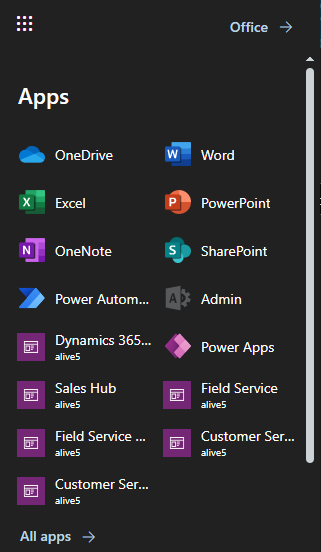
After signing in, select the Dynamics 365 application you want to connect. You will be redirected to the selected Dynamics 365 application.
Application URL
The Application URL can be obtained from the redirected browser URL.
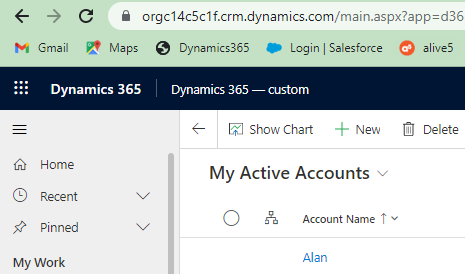
For example, if the redirected URL is:
https://orgc14c5c1f.crm.dynamics.com/main.aspx?appid=xxxxxxxxxxx
the Application URL is:
https://orgc14c5c1f.crm.dynamics.com/
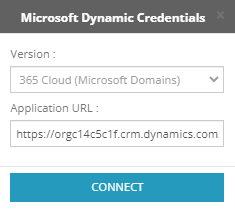
Enter the Application URL in Alive5 and click Connect.
365 Cloud (Dataverse Application User)
If you are using the 365 Cloud (Dataverse Application User) version, provide the following information:
Application URL
Enter the URL of your Microsoft Dynamics 365 instance.
For example:
https://alive5.crm.dynamics.com
App Id
Enter the Application (client) ID of the Azure application.
You can find this under:
Microsoft Azure → App registrations
Client Secret
Enter the Client Secret associated with the Azure application.
You can find this under:
Microsoft Azure → App registrations → Certificates & secrets → Client secrets
Tenant Id
Enter the Azure Active Directory Tenant ID.
You can find this under:
Microsoft Azure → Properties
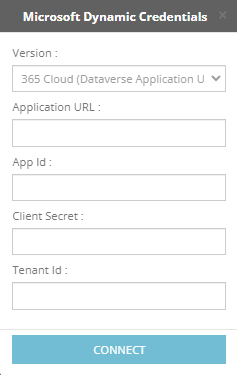
For information about Azure application registration, Microsoft Dynamics CRM API permissions, and creating a Client Secret, refer to the Alive5 - MS Dynamics CRM Dataverse User configuration guide.
After the correct credentials are entered, you will be redirected to Alive5.
The integration status should display Connected.
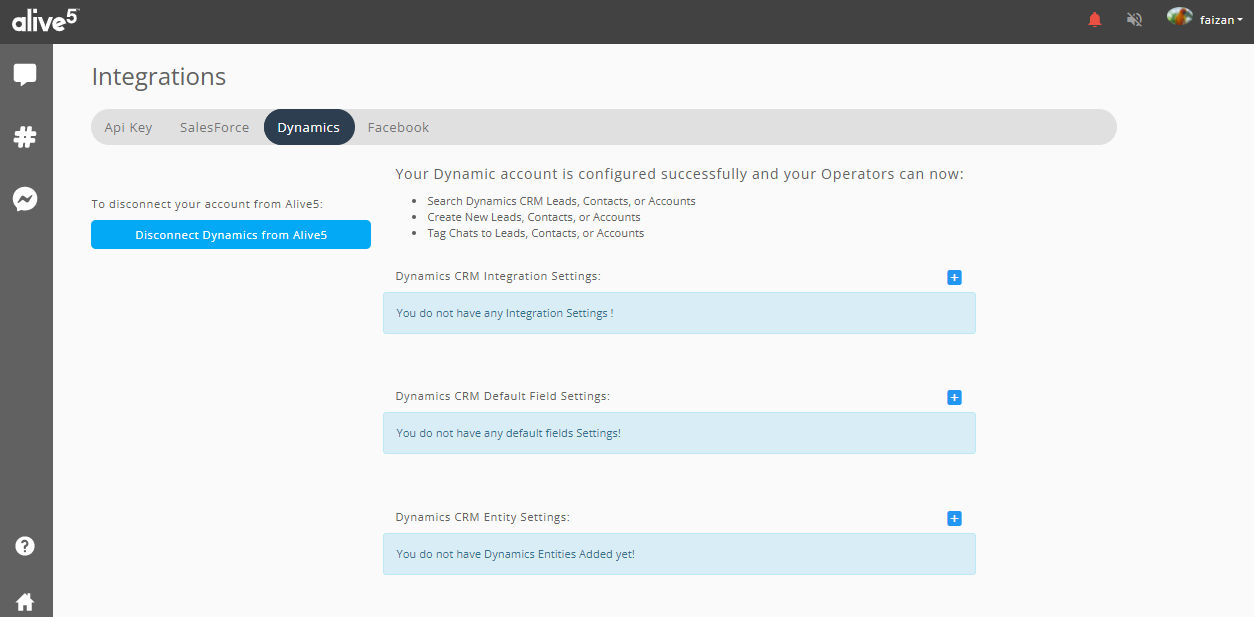
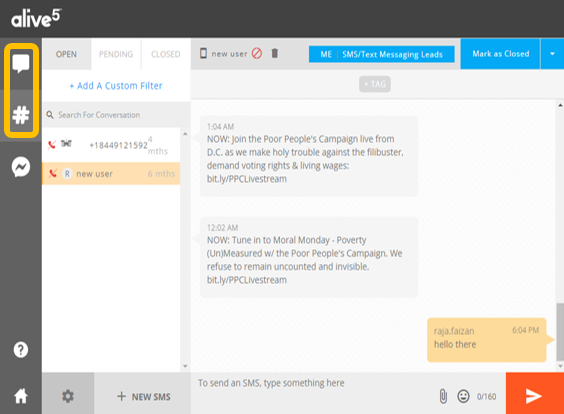
Once the account is synced, go to the SMS or Live Chat applications to begin using the CRM integration.
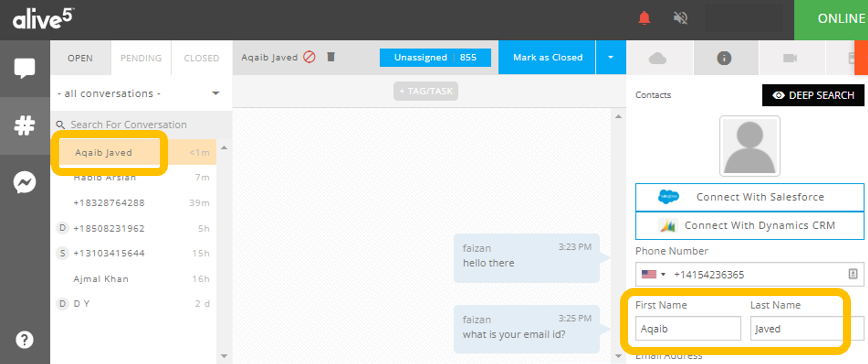
In the right-side panel, select the Info tab. Click Connect with Dynamics CRM.
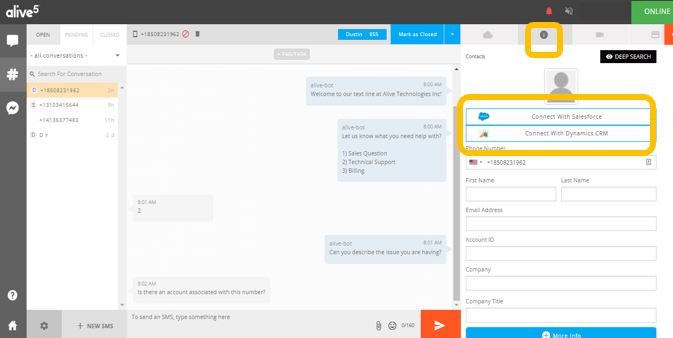
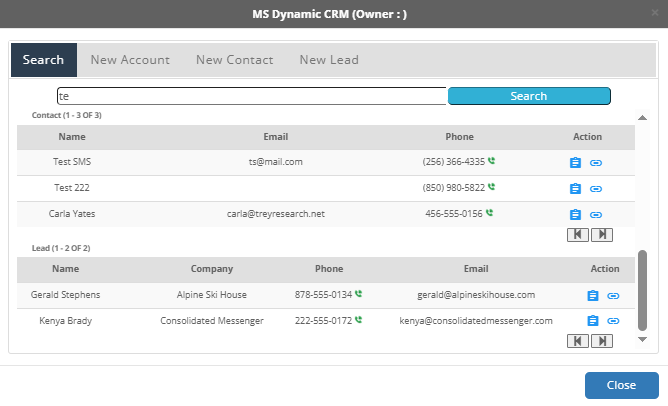
A popup window opens where you can search for existing Dynamics 365 records or create new records.
By default, Alive5 can use the following visitor information when searching for or creating records:
- Phone number
- Email address
- Full name
Integration Settings
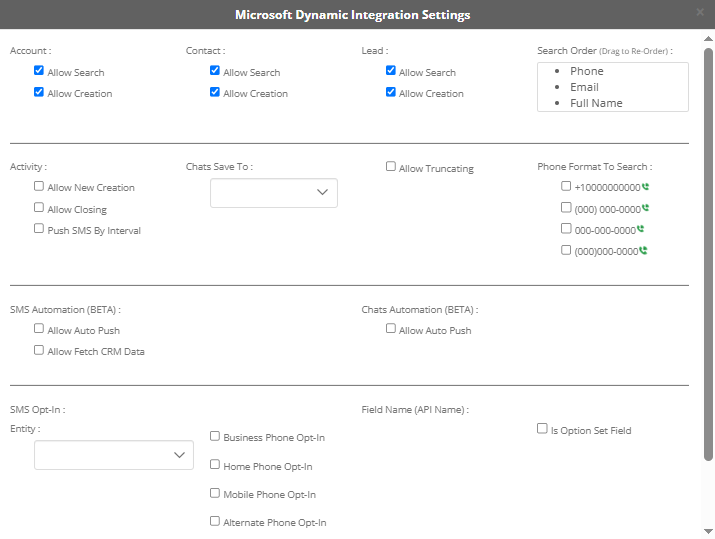
The Integration Settings section allows you to configure how Alive5 interacts with Dynamics 365.
You can control whether agents can search for or create records for the default Dynamics 365 entities:
- Account
- Contact
- Lead
Open Integration Settings
Click the configuration/settings button.


The Integration Settings form opens
Account Settings
Allow Account Search
When enabled, agents can search for Dynamics 365 Account records.
When disabled, Account search is unavailable.
Default: Enabled.
Allow Account Creation
When enabled, agents can create new Dynamics 365 Account records.
When disabled, agents cannot create new Account records.
Default: Enabled.
Allow Contact Search
When enabled, agents can search for Dynamics 365 Contact records.
When disabled, Contact search is unavailable.
Default: Enabled.
Allow Contact Creation
When enabled, agents can create new Dynamics 365 Contact records.
When disabled, agents cannot create new Contact records.
Default: Enabled.
Allow Lead Search
When enabled, agents can search for Dynamics 365 Lead records.
When disabled, Lead search is unavailable.
Default: Enabled.
Allow Lead Creation
When enabled, agents can create new Dynamics 365 Lead records.
When disabled, agents cannot create new Lead records.
Default: Enabled.
Search Order (Drag To Reorder) Explanation
The Search Order setting determines the order in which Alive5 searches for Dynamics 365 records.
You can prioritize the following visitor fields:
- Phone
- Full name
Drag and drop the fields to define the search priority.
Example: If the order is Phone → Email → Full Name, Alive5 searches for a matching phone number first. If no matching record is found, it searches by email address. If no email match is found, it searches by full name.
SCENARIO#1: WHEN ALL THREE FIELDS ARE AVAILABLE
If the visitor provides a phone number, email address, and full name:
- Alive5 searches Dynamics 365 using the visitor's phone number.
- If no matching record is found, Alive5 searches using the visitor's email address.
- If no matching record is found, Alive5 searches using the visitor's full name
SCENARIO#2: WHEN NOT ALL THREE FIELDS ARE AVAILABLE
If the visitor does not provide a phone number:
- Alive5 searches using the visitor's email address.
- If no email address is available, Alive5 searches using the visitor's full name.
The same principle applies when other visitor fields are unavailable.
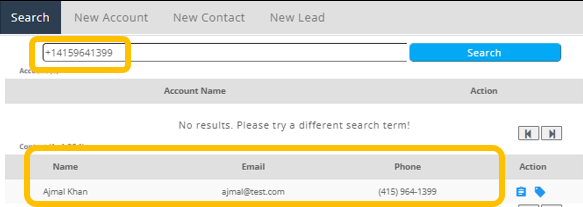
SYSTEM FETCHES RECORDS ON BASIS OF PHONE NUMBER
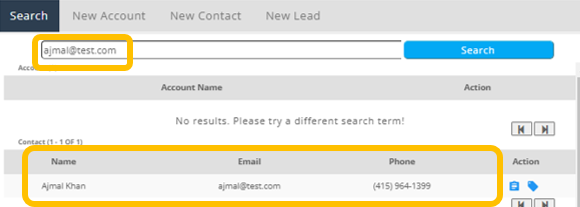
SYSTEM FETCHES RECORDS ON BASIS OF EMAIL ADDRESS
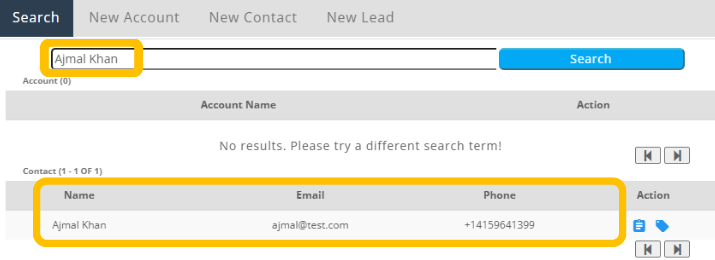
SYSTEM FETCHES RECORDS ON BASIS OF FULLNAME
Activity Settings
Allow New Creation
The Allow New Creation setting determines how new SMS messages are stored as Dynamics 365 activities.
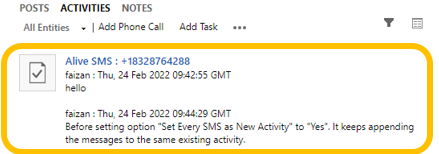
Disabled
When disabled, new messages are appended to the same existing activity.
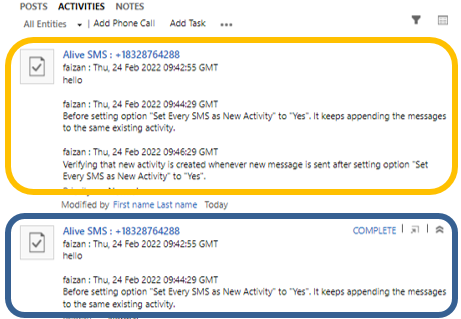
Enabled
When enabled, a new activity is created whenever a new SMS message is sent by either the agent or the visitor.
The new activity contains the applicable conversation content.
Allow Activity Closing
The Allow Activity Closing setting controls whether Dynamics 365 activities are automatically marked as completed after conversations are pushed to Dynamics 365.
When enabled:
- Activities are marked as completed after the conversation is pushed.
- For SMS, a new activity is created after a 24-hour gap when a new SMS is sent or received.
- For chats, each new activity is created and marked as completed.
By default, chats are saved to Notes. The Notes entity cannot be marked as closed using the activity state functionality and may produce the following error:
The 'setstatedynamicentity' method does not support entities of type 'annotation'.Push SMS By Interval
The SMS Push Interval setting determines how frequently SMS messages are pushed to Microsoft Dynamics 365.
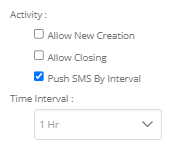
- 1, 2, 6, and 12 Hours
When configured, the system pushes all available SMS messages during the initial run. Subsequent pushes follow the configured interval, aligned to the next applicable time boundary.
- 24 Hours
When configured, the system pushes all available SMS messages during the initial run. Subsequent pushes occur daily at 12:00 AM (midnight).
- Changing the Interval
When the interval is changed, already scheduled processing continues using the previous interval, while subsequent processing follows the newly configured interval.
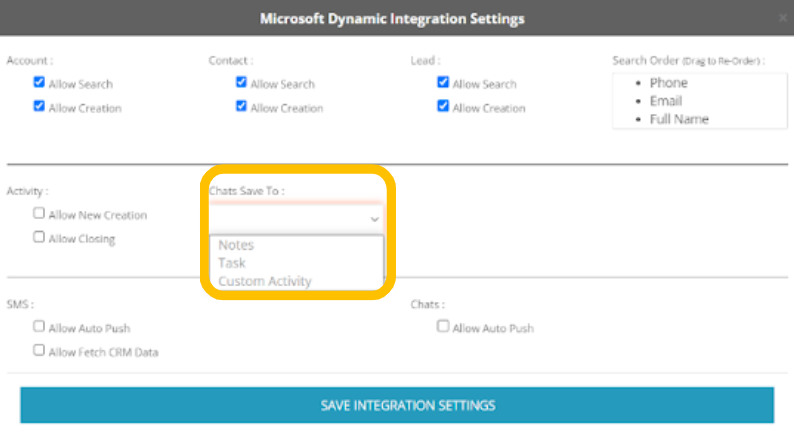
Chats Save To
The Chats Save To setting determines where SMS and chat transcripts are saved in Dynamics 365.
The available options are:
- Notes
- Task
- Custom Activity Type
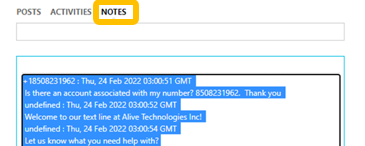
- Notes: Notes are selected by default. All the chat/SMS transcripts will be saved into the Notes entity.
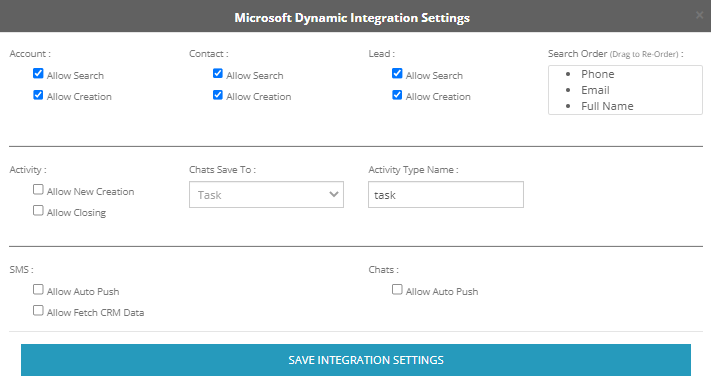
- Task: Select this option if you want to save chat transcripts into Activities > Task. When using this option, set Activity Type Name to: Task.
Note: If the Activity Type Name is not set to Task, the integration may produce an error.
When saving SMS/Chat conversations to a Task, the conversation may exceed the default 2,000-character limit of the Description field. This can cause the following validation error and prevent the conversation from being saved to the record:
To resolve this issue:
- In Microsoft Dynamics 365, navigate to Settings > Customizations > Customize the System.
- Under Entities, expand Task and select Fields.
- Locate and open the Description field.
- Increase the Maximum Length value to accommodate longer SMS/Chat conversations.
- Save and publish the customizations.
Once updated, the Description field can accommodate longer conversation content, helping prevent the validation error when saving SMS/Chat conversations to Task against a record.
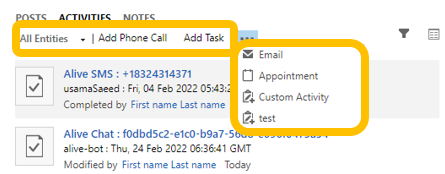
- Custom Activity Type: This option enables users to save chat/SMS transcripts into any custom activity. Enter the name of the custom activity in Activity Type Name. It could be
- Any of three types (already existing):
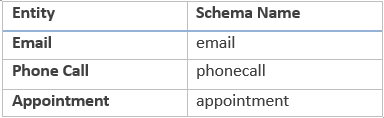
- Or name of custom created entity by the user by following these steps (Example: “test”):
- Go to Menu and click Settings.
- Then click Customizations. Click Customize the System.
- New window will pop-up. Click Entities and then New.
- Fill in the mandatory fields and mark Define as an activity entity as checked.
- Click save and close.
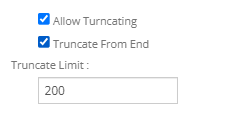
Allow Truncating
The Allow Truncating setting allows you to limit the amount of chat or SMS content saved to the Dynamics 365 activity.
When enabled, specify the Truncate Limit.
By default, the activity is truncated from the beginning.
Enable Truncate From End to truncate the activity from the end instead.
Note: If Allow Truncating is enabled, a truncate limit must be specified.
Phone Format
The Phone Format setting determines the phone number format used when searching for contacts/records in Microsoft Dynamics 365.
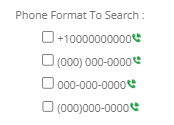
- Phone Format Selection
Users can select the phone number format that matches how numbers are stored in their CRM (e.g., +10000000000 or (000) 000-0000).
Based on the selected format, the integration searches using the relevant phone number format instead of checking multiple formats. This reduces unnecessary searches and improves search performance and response time.
Allow Fetch CRM Data
The Allow Fetch CRM Data setting allows Alive5 to retrieve information from Dynamics 365 using the phone number associated with a new SMS.
When enabled, Alive5 searches Dynamics 365 for a record with the same phone number.
If a matching record is found, available information can be retrieved and automatically populated in the corresponding fields.
For example, the visitor's first and last name can be automatically populated from the Dynamics 365 record.
When Disabled
The corresponding fields remain empty.
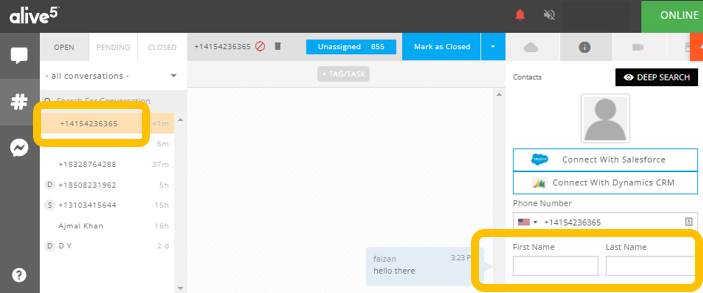
When Enabled
Alive5 retrieves matching information from Dynamics 365 and automatically populates the available fields.
SMS Automation
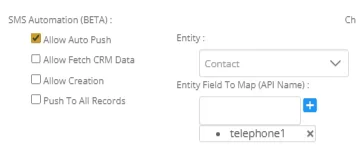
The SMS Automation setting allows Alive5 to automatically associate SMS conversations with Dynamics 365 records.
When enabled, Alive5 searches Dynamics 365 using the configured Entity Field to Map settings for the selected entity.
For example, you can configure:
- Entity: Contact
- Entity Field to Map: telephone1
- Entity Field to Map: emailaddress1
In Dynamics 365:
- telephone1 represents the business phone.
- emailaddress1 represents the email address.
Allow Auto SMS Push
When enabled, Alive5 first uses the visitor's phone number to search for a matching Contact.
If no matching record is found, Alive5 searches using the visitor's email address.
If the visitor does not provide a phone number, Alive5 uses the email address instead.
When a matching record is found, the SMS conversation is automatically associated with that record.
Allow Creation
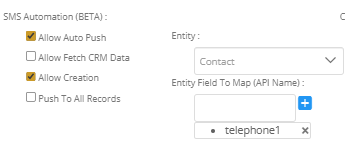
When Allow Creation and Allow Auto SMS Push are both enabled, Alive5 creates a new Dynamics 365 record if no matching record is found.
The SMS conversation is then pushed to the newly created record.
Push To All Records
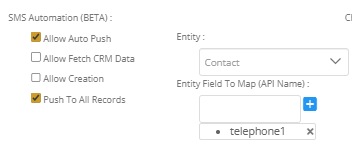
When Push To All Records and Allow Auto SMS Push are enabled, Alive5 pushes the SMS conversation to all Dynamics 365 records that match the configured Entity Field to Map criteria.
Chat Automation
The Chat Automation setting allows Alive5 to automatically associate a live chat with one or more Dynamics 365 records.
You can configure:
- One or more channels
- A Dynamics 365 entity
- Entity fields to map
- Field identifier priority
- Whether a new record should be created when no matching record is found
- Whether the chat should be pushed to all matching records
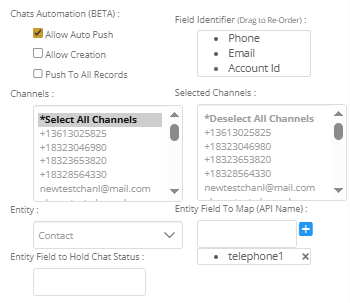
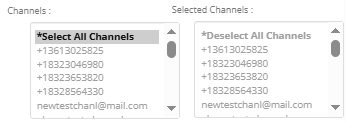
Channel
Selecting one or more channels limits automatic chat pushing to conversations where the chat automation channel matches the selected widget channel.
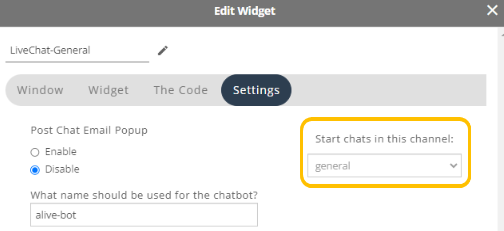
Field Identifier
The Field Identifier determines the order in which Alive5 searches for a matching Dynamics 365 record based on entity field to map.
The available identifiers include:
- Phone
- Account ID
Example: You can configure the following order:
- Phone
- Account ID
with phone and email as mapping fields
Alive5 first searches Dynamics 365 using the visitor's phone number.
If no matching record is found, Alive5 searches using the visitor's email address.
If the visitor does not provide a phone number, Alive5 uses the next available identifier.
If one or more matching records are found, the chat thread is pushed to those records when the chat ends.
Allow Auto Chat Push
When enabled, Alive5 pushes conversation to the very first matching record found in Salesforce against the configured entity, entity field to map and the field identifier.
Allow Creation
When Allow Creation is enabled and no matching Dynamics 365 record is found, Alive5 creates a new record against the selected entity.
The new record can use the visitor's available information, such as their full name.
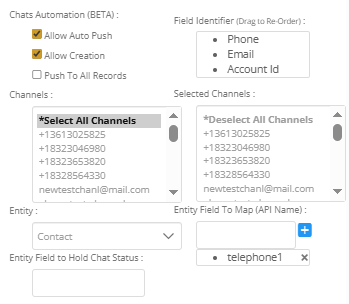
Push To All Records
When Push To All Records is enabled, Alive5 pushes the chat to all Dynamics 365 records matching the configured Entity Field to Map criteria.
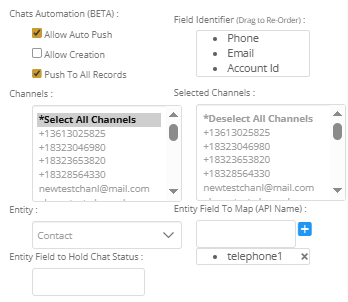
Important: When both Push To All Records and Allow Creation are enabled, Alive5 creates a new record only when no matching record is found.
If matching records exist, the chat is pushed to all matching records.
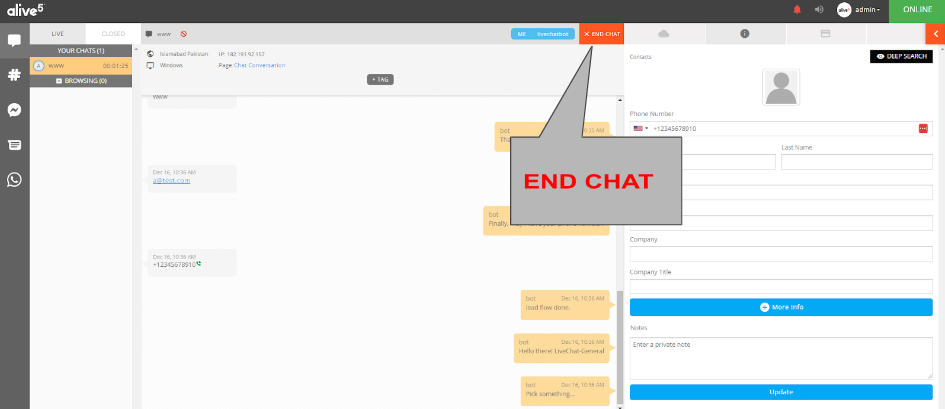
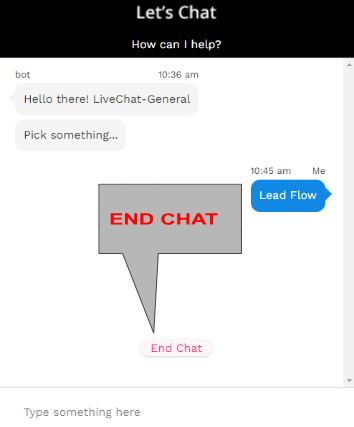
SMS Opt-In
The SMS Opt-In settings allow Alive5 to send the SMS opt-in value for the current SMS contact to Dynamics 365.
SMS Opt-In - Entity
Select the Dynamics 365 entity to which the SMS opt-in value should be pushed.
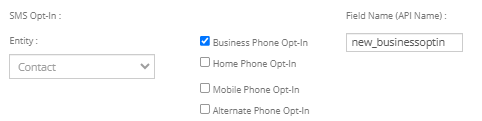
SMS Opt-In - Field Name
After selecting an SMS Opt-In entity, configure the field that should receive the opt-in value.
The field name must be the Dynamics 365 API field name associated with the applicable phone number.
The available phone types include:
- Business
- Home
- Mobile
- Alternate Phone
Default Field Settings
The Default Field Settings section allows you to configure which default fields are required and which fields appear on the record creation form.
You can configure settings for:
- Account
- Contact
- Lead
Configure Default Field Settings
- Open the Dynamics 365 integration settings.
- Select the Default Field Settings configuration button.

- The Default Field Settings form opens.
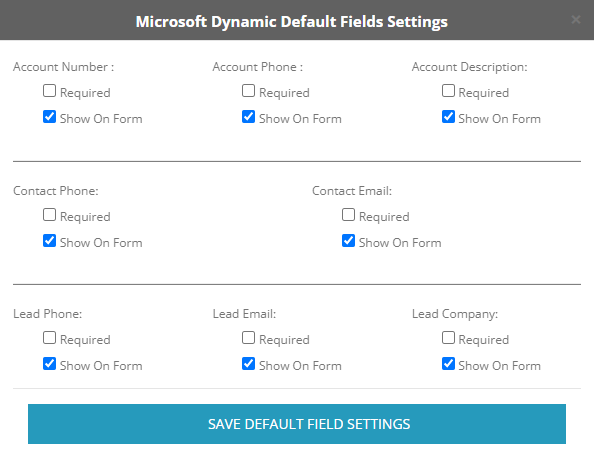
Account Fields
Account Number Required
When enabled, the agent must provide an Account Number when creating a new Account.
Account Number Show on Form
When enabled, the Account Number field appears on the Account creation form. Default: Enabled.
Account Phone Required
When enabled, the agent must provide a phone number when creating a new Account.
Account Phone Show on Form
When enabled, the Account Phone field appears on the Account creation form. Default: Enabled.
Account Description Required
When enabled, the agent must provide a description when creating an Account.
Account Description Show on Form
When enabled, the Account Description field appears on the Account creation form. Default: Enabled.
Contact Fields
Contact Phone Required
When enabled, the agent must provide a phone number when creating a Contact.
Contact Phone Show on Form
When enabled, the Contact Phone field appears on the Contact creation form. Default: Enabled.
Contact Email Required
When enabled, the agent must provide an email address when creating a Contact.
Contact Email Show on Form
When enabled, the Contact Email field appears on the Contact creation form. Default: Enabled.
Lead Fields
Lead Phone Required
When enabled, the agent must provide a phone number when creating a Lead.
Lead Phone Show on Form
When enabled, the Lead Phone field appears on the Lead creation form. Default: Enabled.
Lead Email Required
When enabled, the agent must provide an email address when creating a Lead.
Lead Email Show on Form
When enabled, the Lead Email field appears on the Lead creation form. Default: Enabled.
Lead Company Required
When enabled, the agent must provide a company name when creating a Lead.
Lead Company Show on Form
When enabled, the Lead Company field appears on the Lead creation form. Default: Enabled.
Entity Settings
The Entity Settings section allows you to add entities other than the default:
- Account
- Contact
- Lead
For example, you can add an Opportunity or Task entity.
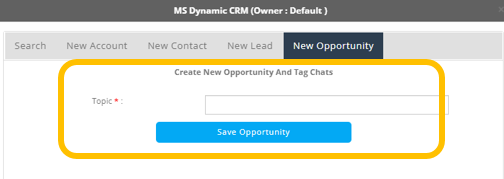
After adding an entity, agents can search for records, create records, view details, and associate SMS or chat conversations with records belonging to that entity.
Configuring Custom Entity
- Open Entity Settings.
- Select the configuration or add button.

- Enter the entity information.
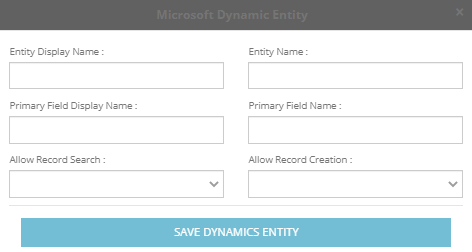
Entity Display Name
Enter the name that agents will see when using the Dynamics 365 integration.
Entity Name
Enter the entity name exactly as it appears in Dynamics 365.
Primary Field Display Name
Enter the display name of the primary field that agents will see.
Primary Field Name
Enter the primary field name exactly as it appears in Dynamics 365.
Allow Record Search
When enabled, agents can search records for the newly added entity.
Allow Record Creation
When enabled, agents can create records for the newly added entity.
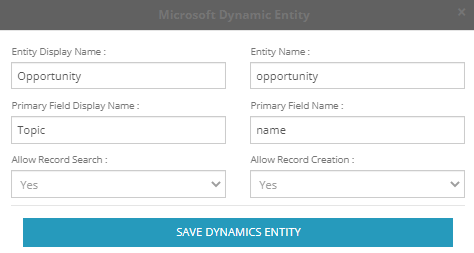
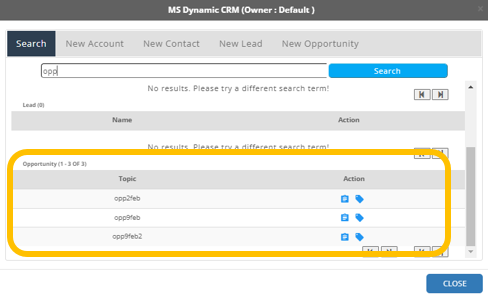
An example: Opportunity
Custom Export Fields
Custom Export Fields allow you to add additional fields belonging to default or custom entities to the record creation form.
You can configure fields as:
- Alive5 Custom Variable
- Constant
- Input Field
Constant
A constant variable sends the same configured value every time a record is created.
The field is not displayed on the record creation form.
Input Field
An input field appears on the record creation form and allows the agent to enter a value.
Input fields can also be marked as required.
Configuring Custom Export Field
- Open Custom Export Fields.
- Select the configuration or add button.

- Configure the field.
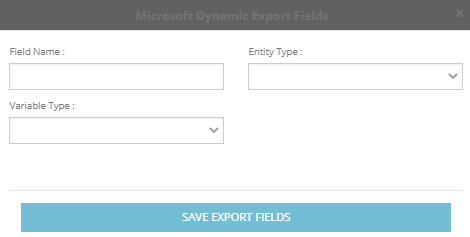
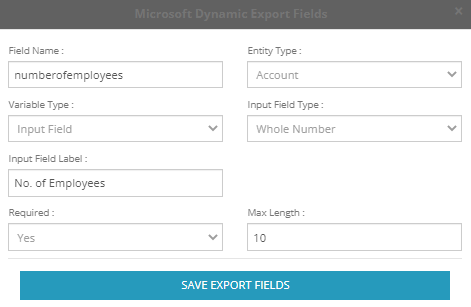
Field Name
Enter the Dynamics 365 API field name. The field name must exactly match the field name in Dynamics 365.
Entity Type
Select the entity from the dropdown list. The list includes the three default entities and any entities added through Entity Settings.
Variable Type
Select one of the following:
- AliveChat Variable: Alive5 Custom Variables can use information associated with a chat conversation, such as:
- Location
- IP Address
- Computer
- Referrer URL
- Page URL
Additional custom variables may be available depending on your Alive5 configuration.
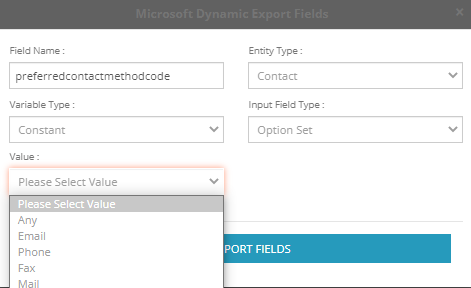
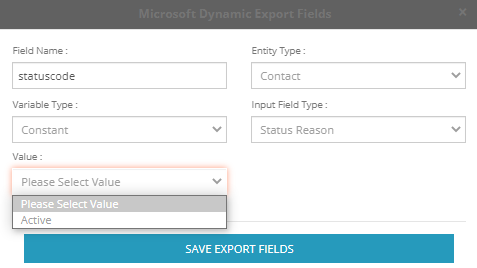
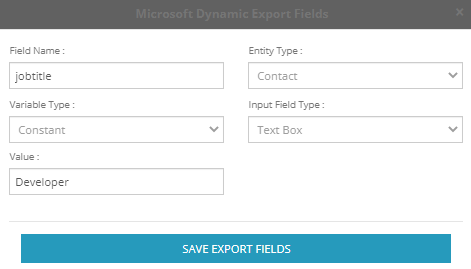
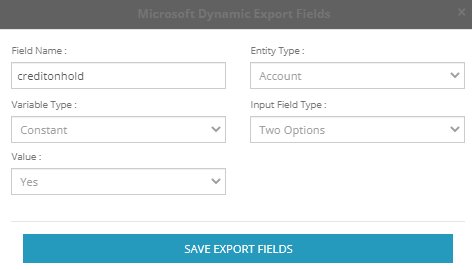
- Constant: A constant variable type allows setting the value for the field while adding the export field. Each time a record is created the same constant value is pushed. And therefore, this field will not be visible on the form.
- Input Field: An input variable type allows to set the value for the field while creating a record unlike constant variable type. This field will appear on the form where the user can provide the value each time a record is created.
Additional field labeled as “Input Field Type” appears on the form in case of ‘constant’ and ‘input field’ variable type.
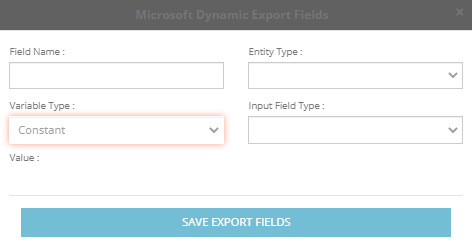
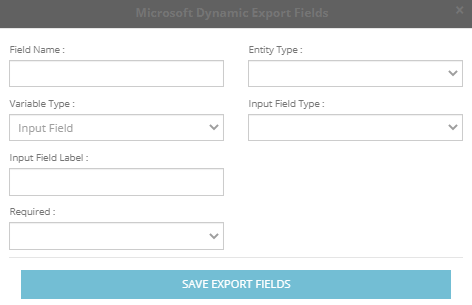
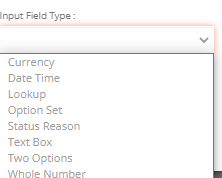
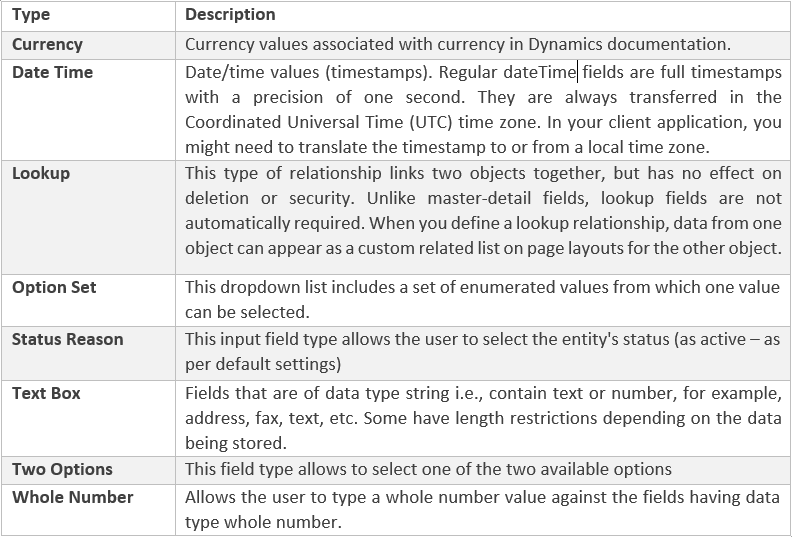
Input Field Type
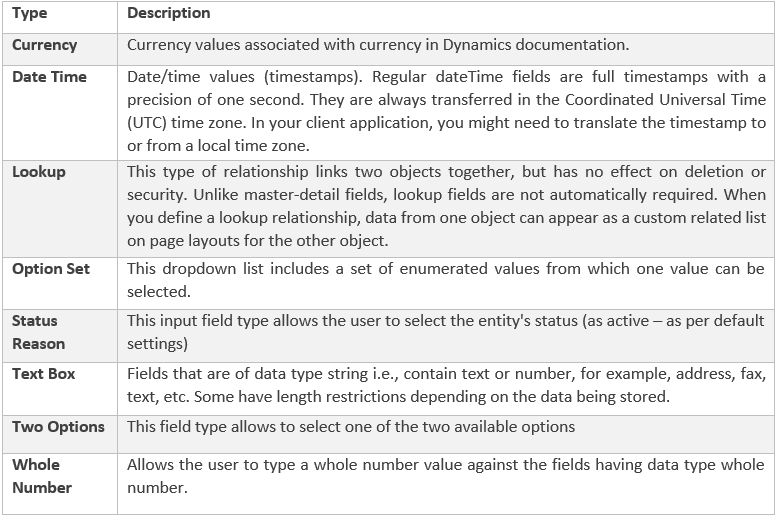
For Constant and Input Field variables, select the appropriate Dynamics 365 data type.
The available types are:
Custom Export Fields – Alive5 Custom Variable
When Alive5 Custom Variable is selected, a Value field appears.
The Value field contains a dropdown list of available Alive5 variables.
Important: The Field Name must exactly match the corresponding field name in Dynamics 365.
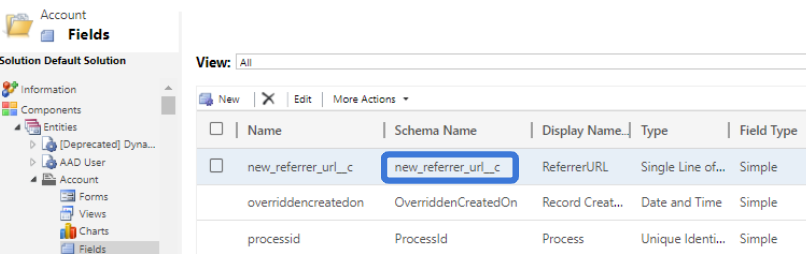
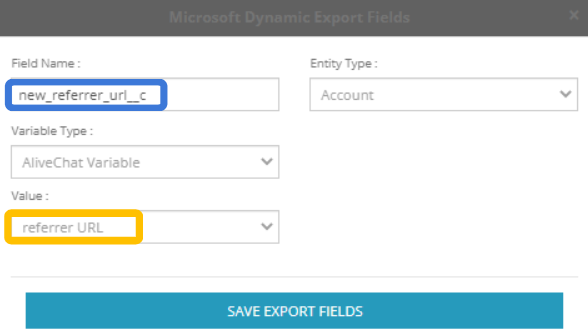
Values for custom variables can be passed through the script or URL used to initiate a chat.
The custom variable name used in the script or URL must match the variable selected in Alive5.
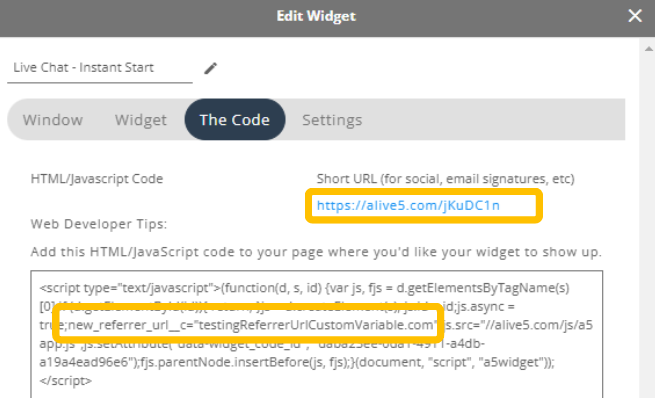
Example
- Configure the custom export field.
- Pass the custom variable through the chat initiation script or URL.
- Initiate a chat.
- End the chat.
- Open Alive5.
- Click Connect with Dynamics CRM.
- Select the Accounts
- Create a new Account.
- Click Save Account.
The configured custom variable is passed to the corresponding Dynamics 365 field.
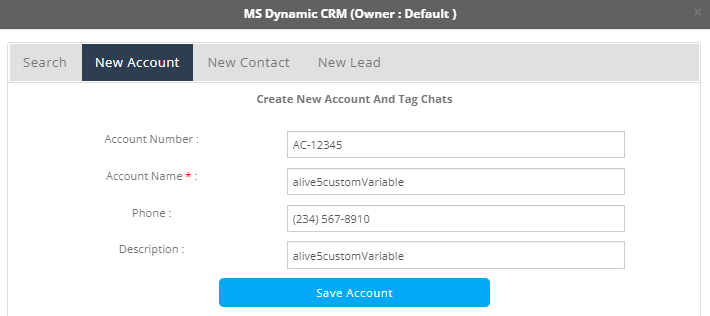
Custom Export Fields – Constant Variable Type
When Constant is selected, additional fields appear based on the selected Input Field Type.
For most field types, a Value field is displayed.
For Lookup fields, the following fields are displayed:
- Related Entity
- Lookup
- Currency input field type:

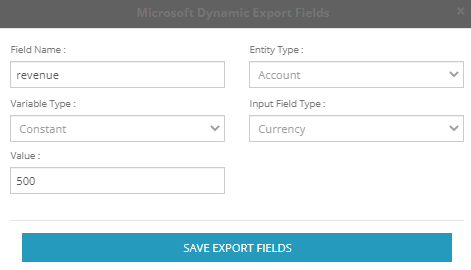
- Date input field type:
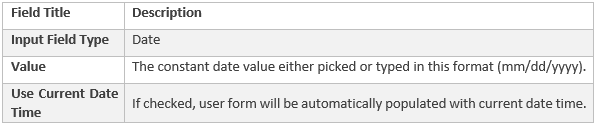
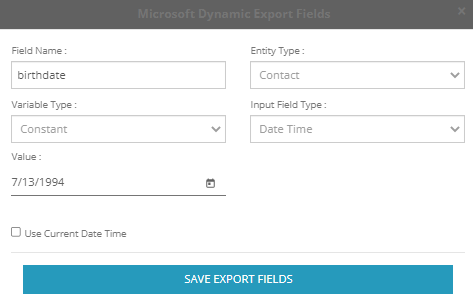
- Lookup input field type:
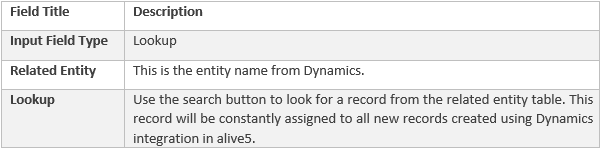
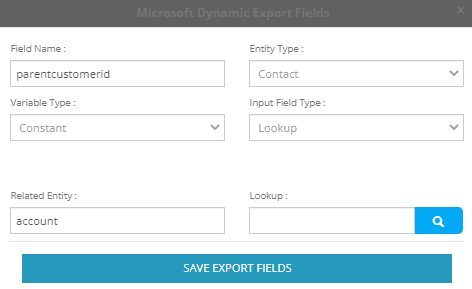
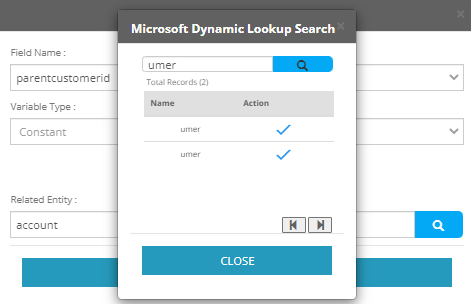
- Option Set input field type:

- Status Reason input field type:

- Text Box input field type:

- Two Options input field type:

- Whole Number input field type:

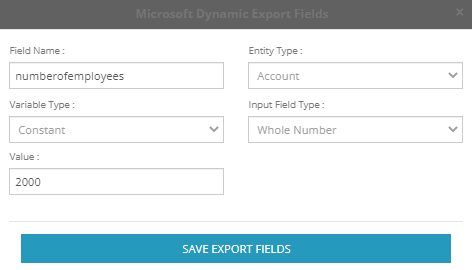
Custom Export Fields – Input Variable Type
When Input Field is selected, additional fields appear on the configuration form.
These include:
- Input Field Label
- Required
Additional options depend on the selected field type.
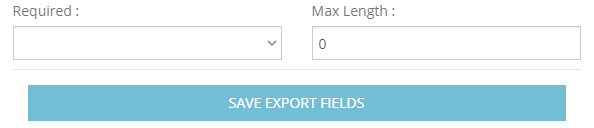
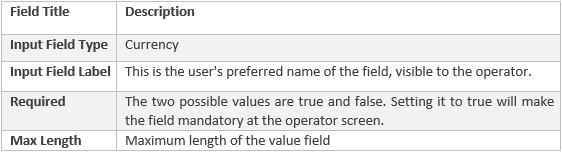
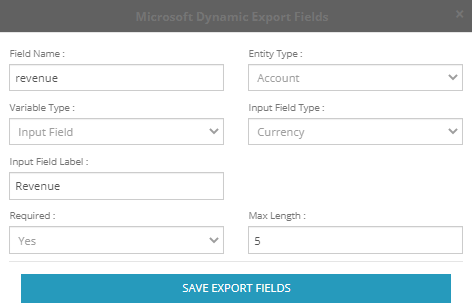
- **Currency, Text Box, and Whole Number
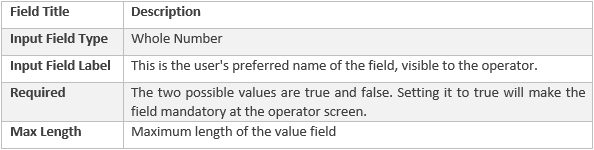
For Currency, Text Box, and Whole Number fields, a Max Length** field is available. Enter a numeric value to limit the amount of information an agent can enter.
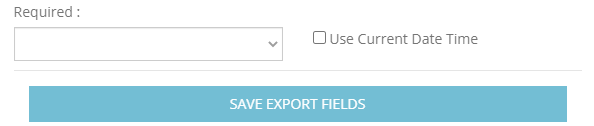
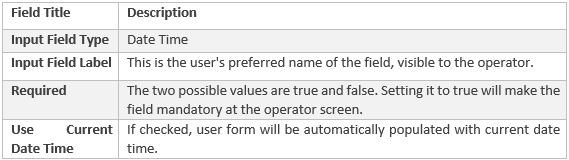
- **Date
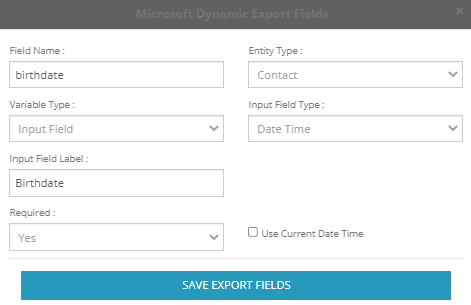
For Date fields, Use Current Date Time** is available. When enabled, the current date is automatically displayed in the date field on the record creation form. When disabled, the date field displays the default date format.
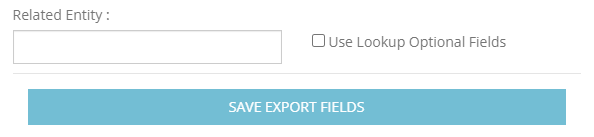
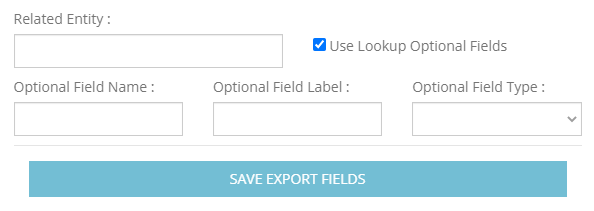
- **Lookup
**For Lookup fields, the following options are available:
- Related Entity
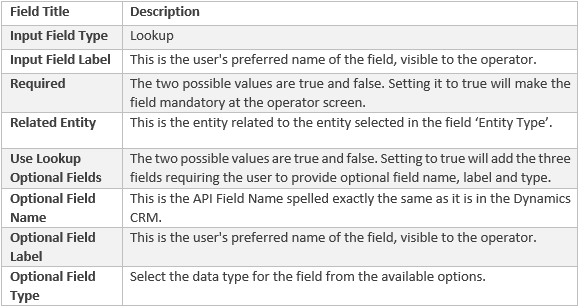
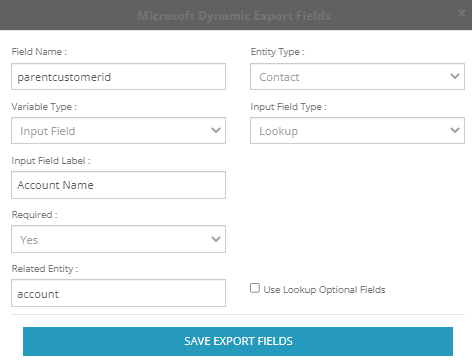
- Use Lookup Optional Fields
When Use Lookup Optional Fields is enabled, additional lookup options appear on the form.
- Currency input field type:
- Date Time input field type:
- Lookup input field type:
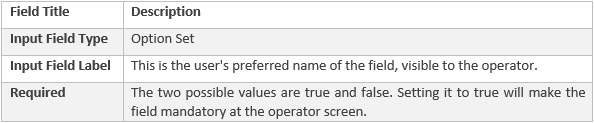
- Option Set input field type:
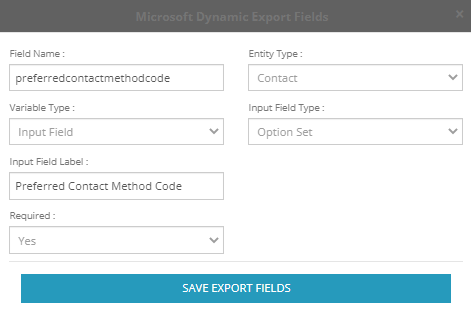
- Status Reason input field type:
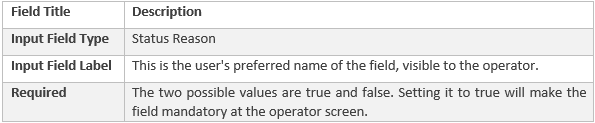
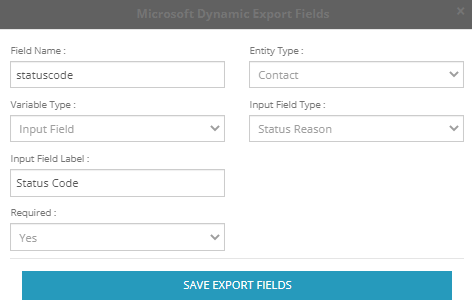
- Textbox input field type:
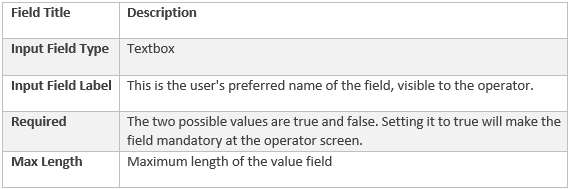
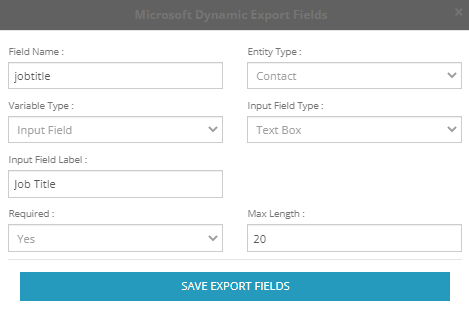
- Two Options input field type:
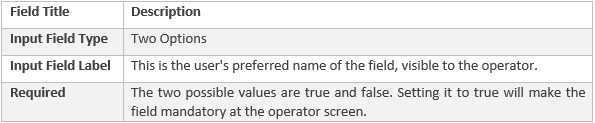
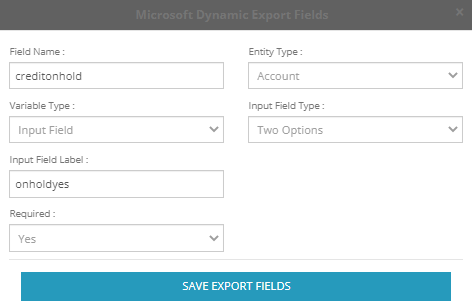
- Whole Number input field type:
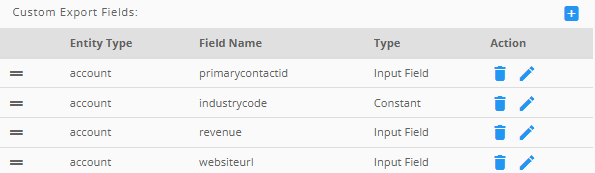
Drag and Drop for Custom Export Fields
You can change the order in which Input Field type export fields appear on the record creation form.
- Click and hold the drag-and-drop icon next to the field.

- Move the field upward or downward.
- Release the field in the desired location.
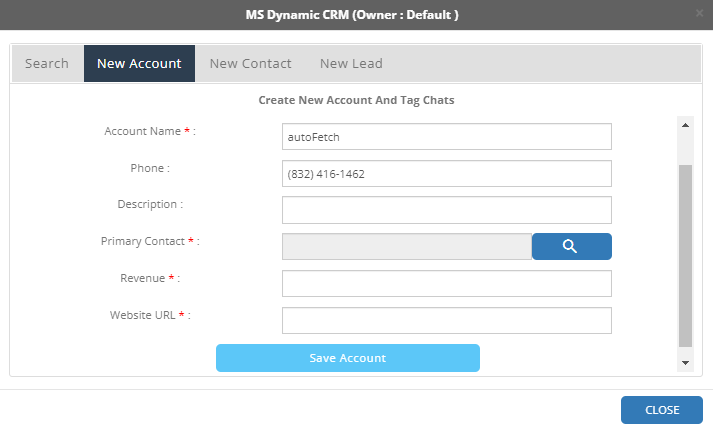
The fields appear on the record creation form according to the configured order.
Custom Search Fields
By default, agents can search for Dynamics 365 records using:
- Name
- Phone number
If you want agents to search using additional fields, use Custom Search Fields.
Adding a Custom Search Field adds an additional column to the search results.
Add a Custom Search Field
- Open Custom Search Fields.
- Select the configuration or add button.

- Configure the field.
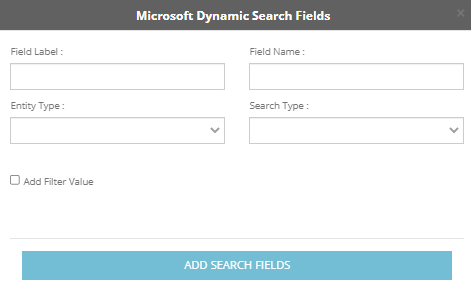
Field Label
Enter the label that should appear in the search results.
Field Name
Enter the Dynamics 365 field name. The field name must exactly match the field name in Dynamics 365.
Entity Type
Select the entity for which the search criteria should be applied.
Search Type
Select the data type of the field.
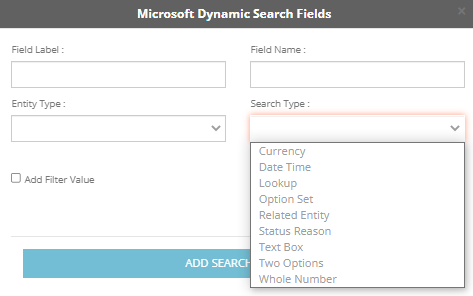
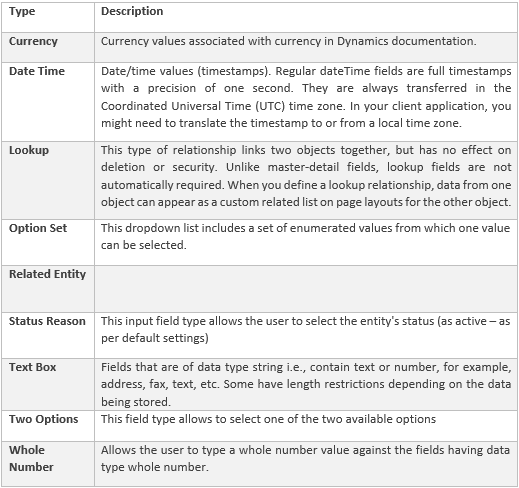
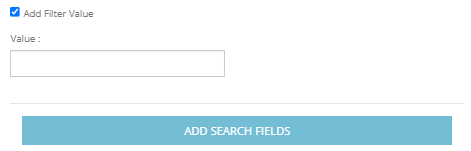
Add Filter Value
Enable Add Filter Value to apply a predefined filter. The search will return only records that meet the configured filter criteria.
When enabled, a Value field appears.
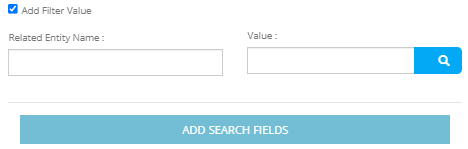
For Lookup fields, the following additional fields are available:
- Related Entity Name
- Value
Custom Search Fields – Add Filter Value Disabled
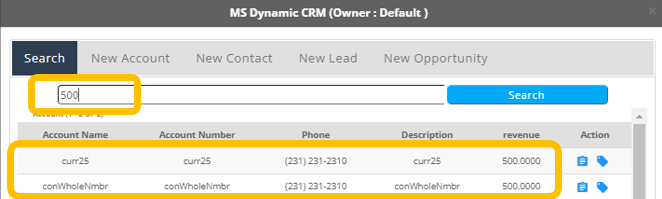
When Add Filter Value is disabled, agents can use the configured field value as a search criterion.
For example, you can add a Currency type Revenue field for the Account entity.
If the agent enters 500 as the search value, Alive5 returns Account records where the annual revenue is 500.
Custom Search Fields – Add Filter Value Enabled
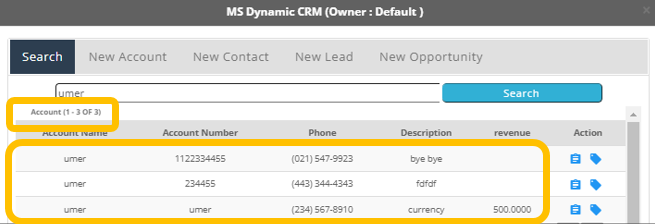
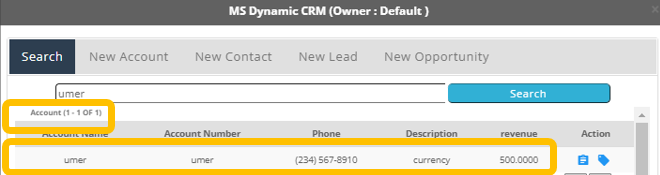
When Add Filter Value is enabled, the configured value acts as a filter.
For example, configure:
- Entity: Account
- Field: Revenue
- Filter Value: 500
Alive5 returns only Account records whose annual revenue is 500.
This feature can be used to limit the number of records returned by a search.
Result of searching records without applying filter:
Result of searching records when filter value of 500 as annual revenue is applied:
Drag and Drop Feature for Custom Search Fields
You can change the order in which Custom Search Fields appear on the search form.
- Click and hold the drag-and-drop icon.
- Move the field upward or downward.
- Release the field in the desired position.
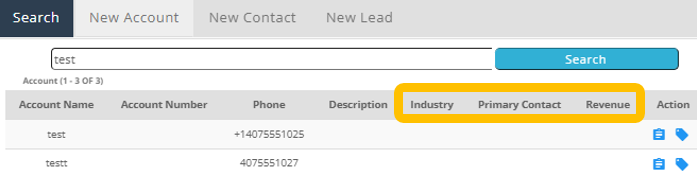
The search fields appear on the form according to the configured order.
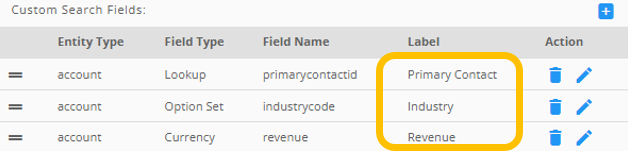
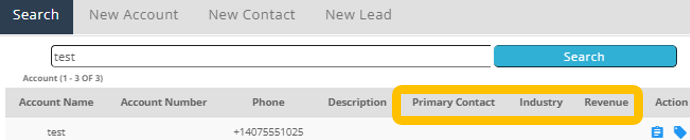
Altering the positions of the fields like this
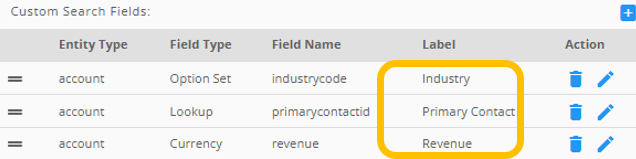
will yield following output
Custom Detail Fields
Custom Detail Fields allow agents to view additional information about Dynamics 365 records.
The default detail fields are:
- Account: Account Name, Account Number, Phone, Description
- Contact: Name, Email, Phone
- Lead: Name, Company, Phone, Email
Add a Custom Detail Field
- Open Custom Detail Fields.
- Select the configuration or add button.

- Configure the field.
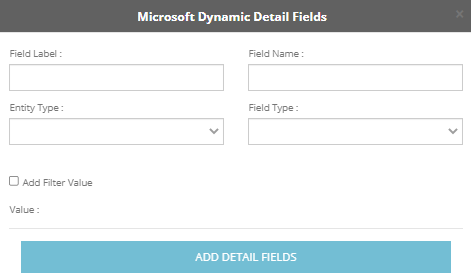
Label
Enter the label that should appear in the detail view.
Field Name
Enter the Dynamics 365 field name. The field name must exactly match the corresponding field in Dynamics 365.
Entity Type
Select the entity for which the detail field should be added.
Field Type
Select the data type of the field.
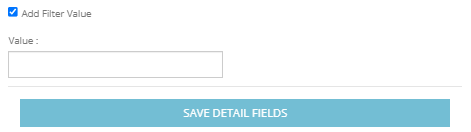
Add Filter Value
Enable this option to apply a predefined filter.
When enabled, a Value field appears.
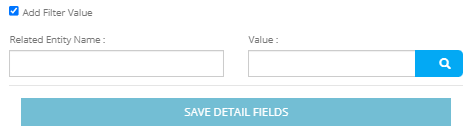
For Lookup fields, the following additional fields are available:
- Related Entity Name
- Value
View Custom Detail Fields
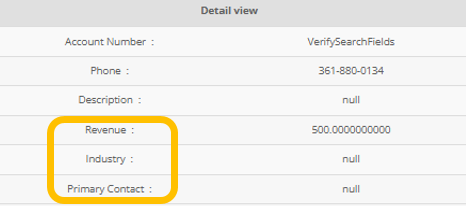
After Custom Detail Fields have been configured, agents can view them by clicking the Details icon

under the Action column in the search results.
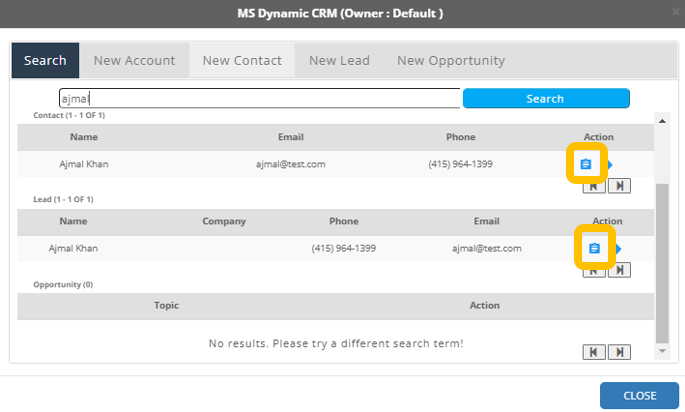
The Detail View displays the default fields as well as the configured custom detail fields.
You can add as many detail fields as required.
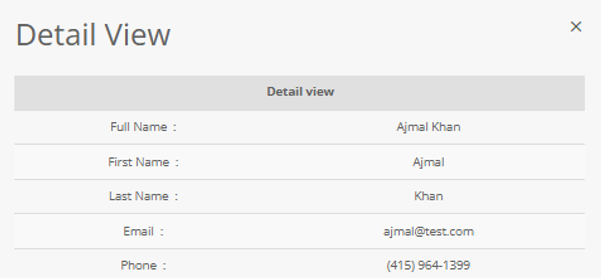
Custom Detail Fields – Add Filter Value Disabled
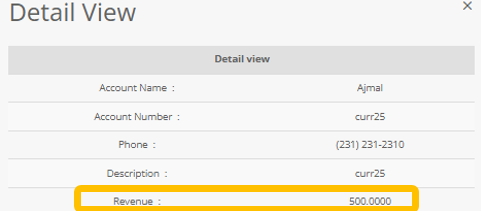
When Add Filter Value is disabled, the configured field is displayed in the record Detail View.
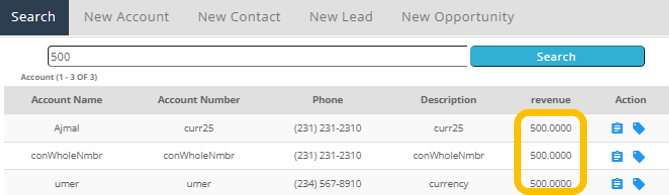
The field can also be used as a search criterion.
For example, adding a Currency type Revenue field for the Account entity allows agents to:
- View the Revenue value in the Detail View.
- Search for Accounts using the Revenue value.
Custom Detail Fields – Add Filter Value Enabled
When Add Filter Value is enabled, Alive5 returns only records that meet the configured filter criteria.
For example, configure:
- Entity: Account
- Field: Revenue
- Filter Value: 500
Only Accounts whose annual revenue is 500 are returned.
This feature can be used to limit the number of records returned.
Result of searching records without applying filter:
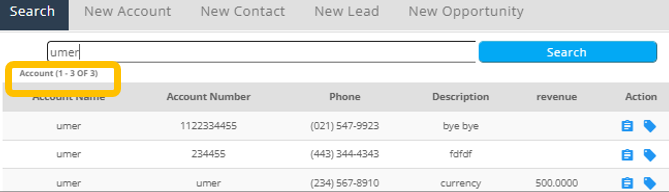
Result of searching records when filter value of 500 as annual revenue is applied:
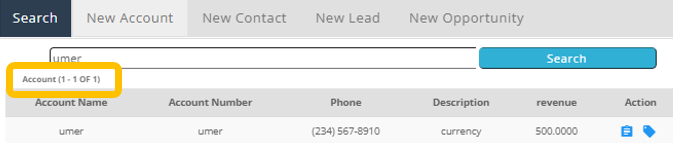
Drag and Drop Feature for Custom Detail Fields
You can change the order in which Custom Detail Fields appear in the Detail View.
- Click and hold the drag-and-drop icon.
- Move the field upward or downward.
- Release the field in the desired location.
For example, you can arrange the fields in the following order:
- Revenue
- Industry
- Primary Contact
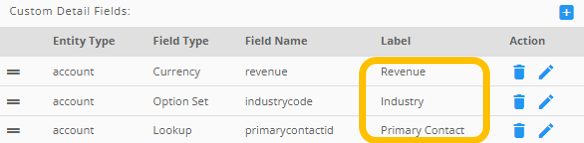
The fields appear in the Detail View according to the configured order.
Backend Fields
Backend Fields allow Alive5 to automatically send data to specific Dynamics 365 fields.
Backend Fields can be configured for default or custom entities.
They can be used when:
- A chat transcript ends.
- An SMS conversation is pushed.
- A new entity record is created.
- A chat or SMS conversation is tagged to a record.
Backend Fields support two variable types:
- Constant
- Input Field
Constant
A Constant variable sends the same configured value each time the relevant record is created or tagged.
The field is not displayed to the agent.
Input Field
An Input Field appears on the relevant form and allows the agent to provide a value.
Configuring Custom Backend Field
- Open Backend Fields.
- Select the configuration or add button.

- Configure the field.
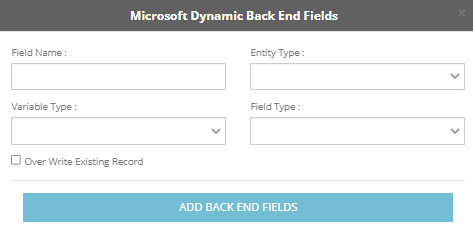
Name
Enter the Dynamics 365 API field name. The field name must exactly match the field name in Dynamics 365.
Entity Type
Select the entity from the dropdown list. The list includes:
- Account
- Contact
- Lead
- Custom entities configured under Entity Settings
Variable Type
Select one of the following:
- Constant: A constant variable type allows setting the value for the field while adding the backend field. Each time a record is created or tagged the same constant value is pushed. And therefore, this field will not be visible on the form.
- Input Field: An input variable type allows setting the value for the field while creating or tagging a record unlike constant variable type. This field will appear on the form where the user can provide the value.
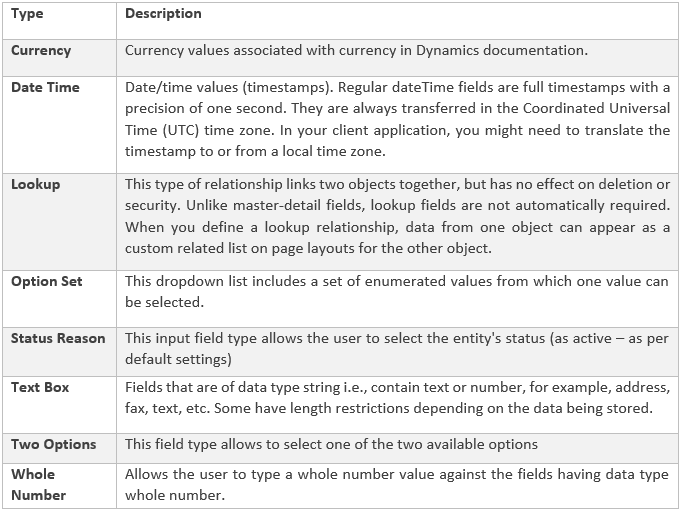
Field Type
Select the Dynamics 365 data type. The available types are:
Overwrite Existing Record
When enabled, the Backend Field value overwrites the existing value in the Dynamics 365 record.
When disabled, existing values are not overwritten.
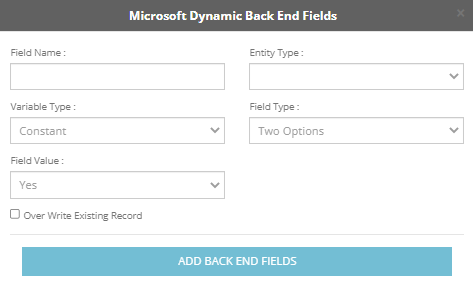
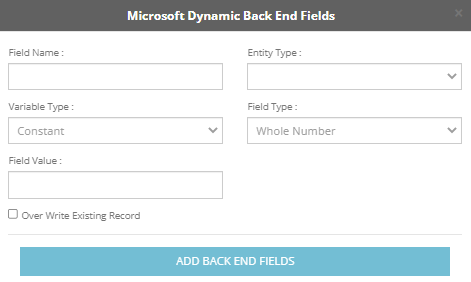
Backend Fields – Constant Variable Type
When Constant is selected, additional configuration fields appear based on the selected Field Type.
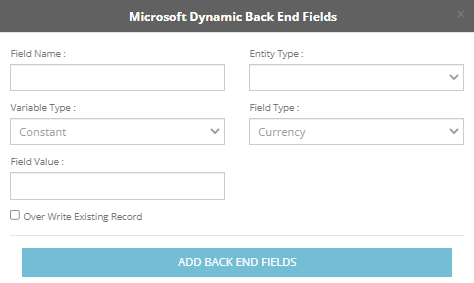
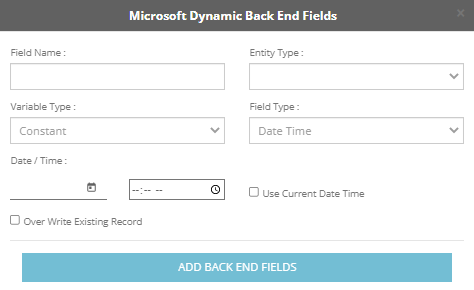
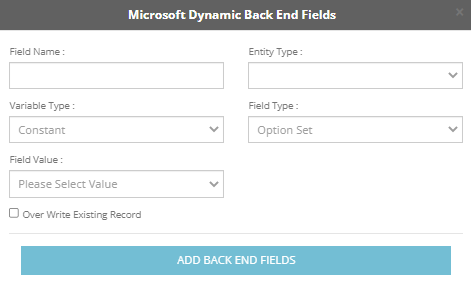
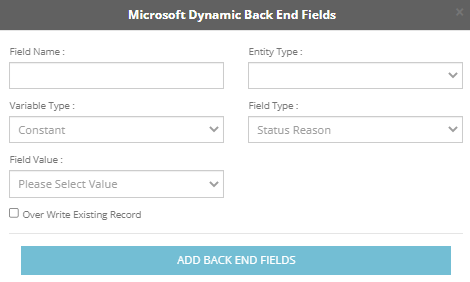
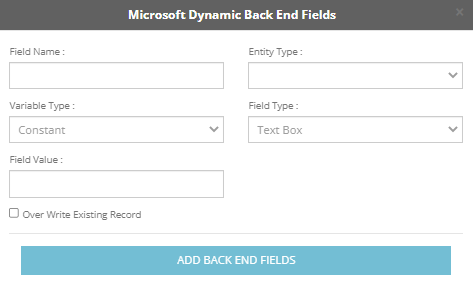
For most field types, a Field Value field is displayed.
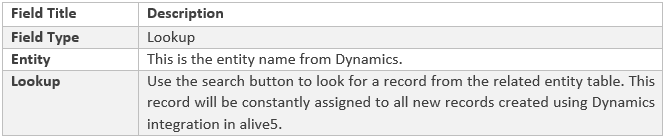
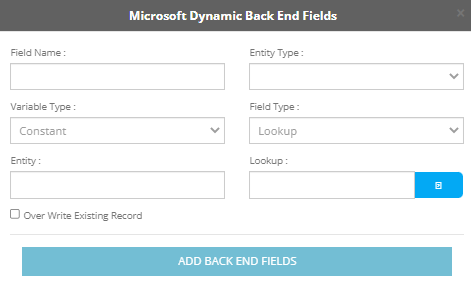
For Lookup fields, the following fields are available:
- Entity
- Lookup
- Currency field type:

- Date Time field type:

- Lookup field type:
- Option Set field type:

- Status Reason field type:

- Text Box field type:

- Two Options field type:

- Whole Number field type:

Backend Fields – Input Variable Type
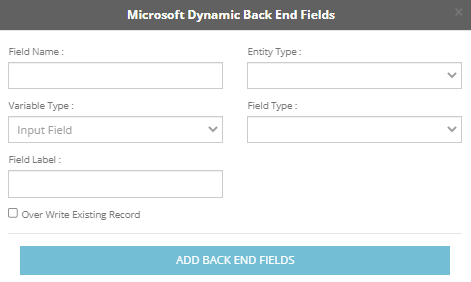
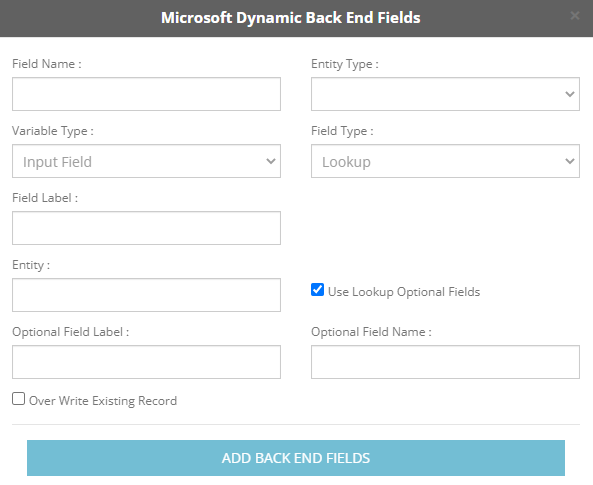
When Input Field is selected, a Field Label is displayed.
The Field Label is the name that the agent sees on the form.
For Lookup fields, additional options are available:
- Entity
- Use Lookup Optional Fields
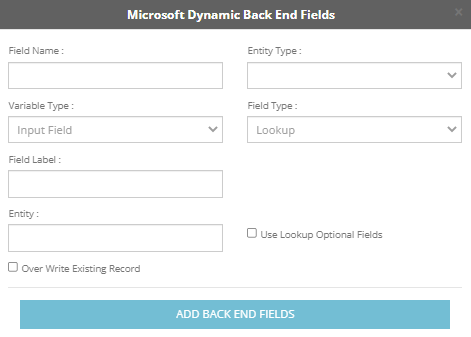
When Use Lookup Optional Fields is enabled, additional lookup options appear.
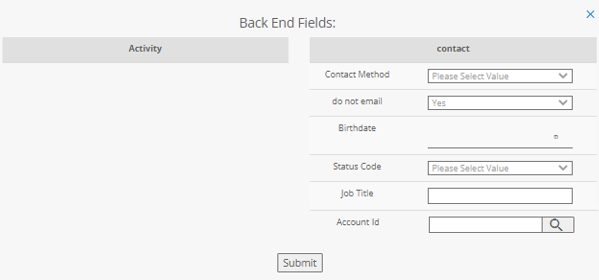
After Backend Fields are configured, the fields appear when creating a new record or tagging an existing record.
Drag and Drop Feature for Backend Fields
You can change the order in which Input Field type Backend Fields appear on the form.
- Click and hold the drag-and-drop icon.
- Move the field upward or downward.
- Release the field in the desired position.
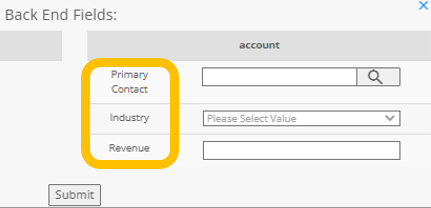
For example, you can configure the following order:
- Primary Contact
- Industry
- Revenue
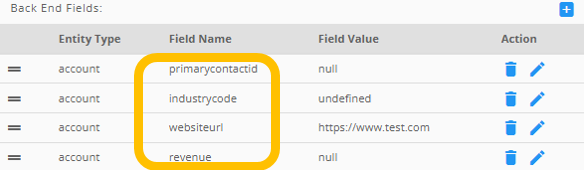
The fields appear on the Backend Fields form according to the configured order.
Pushing SMS / Chats
SMS and chat conversations can be pushed to Dynamics 365 automatically or manually.
Manually Push SMS / Chat
To manually push an SMS or chat conversation:
- Open the SMS or Live Chat
- Open the conversation.
- Select the Info
- Click Connect with Dynamics CRM.
- Search for the required Dynamics 365 record.
After searching, a Tag icon appears under the Action column next to each search result.
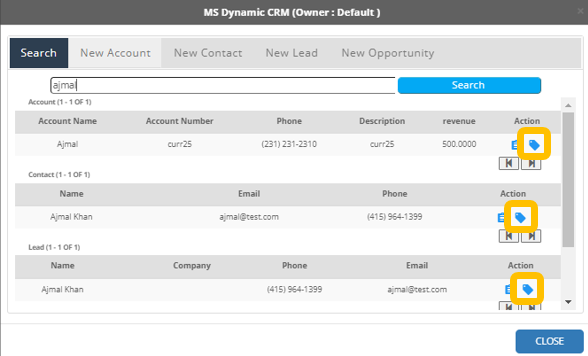
Click the Tag icon for the record you want to associate with the conversation.
Automatic Push
An SMS or chat can be automatically pushed when a new Dynamics 365 record is created, depending on the configured integration settings.
Automatic pushing is controlled by settings such as:
- Allow Auto SMS Push
- Allow Auto Chat Push
- Allow Creation
- Push To All Records
- Entity
- Entity Field to Map
Explained above.
Summary
The Alive5 Microsoft Dynamics 365 integration provides a flexible way to connect SMS and live chat conversations with Dynamics 365 CRM records.
Administrators can configure:
- Dynamics 365 authentication
- Account, Contact, and Lead search
- Account, Contact, and Lead creation
- Search priority
- Activity creation
- Activity closing
- Chat and SMS storage
- Conversation truncation
- CRM data retrieval
- Automatic SMS pushing
- Automatic chat pushing
- SMS opt-in synchronization
- Custom entities
- Custom export fields
- Custom search fields
- Custom detail fields
- Backend fields
- Field ordering
Once configured, agents can use Connect with Dynamics CRM from an SMS or live chat conversation to search for, create, view, and associate Dynamics 365 records directly from Alive5.